To enable XMP in MSI Click BIOS 5, first, ensure that your BIOS is up to date. Then, go to the BIOS settings and enable the XMP profile that corresponds to your desired memory configuration.
Introduction (120 words): Enabling XMP (Extreme Memory Profile) on MSI Click BIOS 5 allows you to maximize the performance of your memory modules by adjusting their settings to their advertised specifications. By activating XMP, you can achieve faster memory speeds and optimized memory timing settings.
However, to enable XMP on MSI Click BIOS 5, you need to follow a couple of steps. Firstly, ensure that your BIOS is updated to the latest version, as this can ensure compatibility with XMP profiles. Secondly, enter the BIOS settings by pressing the designated key during system boot, and navigate to the Memory settings. There, you can locate the XMP profile options and choose the one that matches your memory configuration. By enabling XMP, you can unlock the full potential of your memory modules and enhance your system’s overall performance.
Overview Of Msi Click Bios 5 And Xmp
MSI Click BIOS 5 is a user-friendly interface that allows you to customize and optimize settings on your MSI motherboard. It provides a seamless and intuitive way to access and adjust various parameters, ensuring your system runs smoothly and efficiently. One of the key features of MSI Click BIOS 5 is the support for eXtreme Memory Profile (XMP).
Brief Introduction To Msi Click Bios 5 And Its Benefits
MSI Click BIOS 5 is designed to simplify the process of adjusting BIOS settings and maximizing system performance. With its intuitive interface and user-friendly features, it allows even beginners to easily navigate and customize various settings. Whether you want to overclock your CPU, fine-tune memory timings, or optimize fan speeds, MSI Click BIOS 5 provides the tools you need.
Here are some key benefits of MSI Click BIOS 5:
- Easy to use interface
- Intuitive navigation
- Comprehensive set of customization options
- Real-time monitoring and control of system parameters
Explanation Of Xmp (extreme Memory Profile) And Its Role In Boosting Performance
XMP, or eXtreme Memory Profile, is an Intel technology that allows your motherboard to automatically configure memory settings for optimal performance. It eliminates the need for manual tweaking and ensures that your memory modules are running at their maximum rated specifications.
By enabling XMP in MSI Click BIOS 5, you can experience several benefits:
- Higher memory clock speeds: XMP allows you to run your memory modules at higher frequencies than the default JEDEC settings, which can significantly boost overall system performance.
- Optimized memory timings: XMP also adjusts the memory timings to ensure maximum stability and compatibility, reducing the chances of system crashes or instability.
- Simplified overclocking: With XMP enabled, you don’t have to manually adjust each memory parameter individually. The motherboard takes care of it, making the overclocking process much simpler.
- Guaranteed compatibility: XMP profiles are tested and certified by memory manufacturers, ensuring compatibility and reliability.
Enabling XMP in MSI Click BIOS 5 is a straightforward process. Simply follow these steps:
- Access the BIOS settings by restarting your computer and pressing the designated key during the boot-up process (usually Delete or F2).
- Navigate to the “Memory” or “DRAM” settings section in the BIOS.
- Look for the “XMP Profile” option and select the desired profile.
- Save the changes and exit the BIOS.
Once XMP is enabled, your memory modules will automatically run at their optimized specifications, providing you with enhanced performance and stability.
Make sure to keep your BIOS and motherboard drivers up to date to ensure compatibility with XMP profiles and to take advantage of any performance optimizations or bug fixes that may be available.
Updating The Bios To The Latest Version
Updating the BIOS of your MSI motherboard to the latest version is crucial for optimizing your system’s performance. BIOS updates often include bug fixes, security patches, and performance improvements that can enhance the overall stability and functionality of your computer.
Importance Of Updating The Bios For Optimal Performance
Keeping your BIOS up to date ensures that your system operates at its best and takes advantage of the latest hardware and software technologies. By updating the BIOS, you can experience improved system stability, compatibility with new hardware devices, enhanced power management, and better overall performance.
Steps To Update The Bios To The Latest Version
- Visit the official MSI website and navigate to the support page for your specific motherboard model.
- Download the latest BIOS update for your motherboard.
- Ensure that you have a stable power supply and that your computer is connected to a reliable power source.
- Create a backup of your current BIOS settings and any important data on your system, as updating the BIOS carries a small risk of data loss.
- Extract the downloaded BIOS update file to a USB flash drive formatted in FAT32.
- Restart your computer and enter the BIOS by pressing the designated key during the boot process (usually
DELorF2). - Navigate to the “Settings” or “Advanced” tab in the BIOS menu.
- Select the “Update BIOS” or “Flash BIOS” option.
- Choose the USB flash drive where you have saved the BIOS update file.
- Follow the on-screen instructions to complete the BIOS update process. Do not interrupt the update or power off your computer.
- Once the update is complete, your computer will automatically restart.
- Enter the BIOS again and restore your preferred settings. Make sure to enable XMP in the BIOS settings to unleash the full potential of your memory modules.
- Save the changes and exit the BIOS.
Congratulations! You have successfully updated the BIOS of your MSI motherboard to the latest version. Ensure that you regularly check for new BIOS updates to keep your system running smoothly and efficiently.
Accessing The Msi Click Bios 5
To enable XMP on your MSI motherboard using Click BIOS 5, start by updating your BIOS to the latest version. Then, navigate to the BIOS settings and select the XMP profile that suits your needs. Save the changes and enjoy optimized memory performance.
How To Access The Msi Click Bios 5 Interface
Accessing the MSI Click BIOS 5 interface is a crucial step in enabling XMP on your MSI motherboard. By following these simple steps, you can easily navigate to the BIOS settings and unlock the XMP feature:
- Start by restarting your computer and pressing the “Delete” key or the “F2” key repeatedly during the boot process. This will take you to the BIOS menu.
- Once you have entered the BIOS menu, you will see a list of menus and options. Look for the “Settings” tab and click on it to proceed.
- In the “Settings” tab, you will find the “Advanced” option. Click on “Advanced” to access additional settings.
- Under the “Advanced” settings, you will see multiple options. Look for the “UEFI Firmware Settings” or “Boot” option and click on it.
- Now, you will be directed to the MSI Click BIOS 5 interface, where you can modify various settings to optimize your motherboard’s performance.
Locating The Xmp Settings In The Bios Menu
With the MSI Click BIOS 5 interface in front of you, finding the XMP settings is a breeze. Follow these steps to locate and enable XMP:
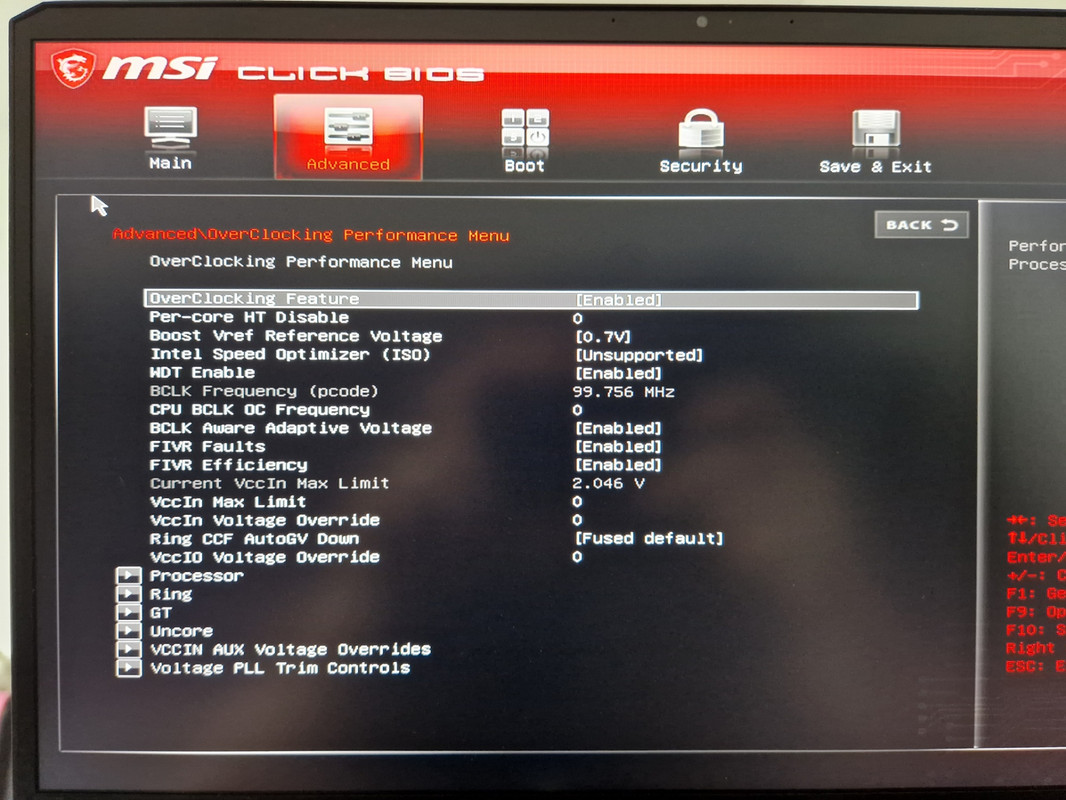
- Within the BIOS interface, go to the “Overclocking” tab. This tab contains several options to enhance your system’s performance.
- Scroll down until you find the “DRAM Configuration” or “Memory” option. Click on it to access the memory settings.
- Under the memory settings, you will see the “Memory XMP Profile” option. This is where you can enable XMP for your RAM.
- Click on the XMP profile that matches your RAM specifications. This will automatically adjust the timings, frequencies, and voltages for optimal performance.
- After selecting the XMP profile, save the changes by clicking the “Save & Exit” button. Confirm your selection by choosing “Yes” to save the changes.
By following these steps, you can easily access the MSI Click BIOS 5 interface and locate the XMP settings to enable XMP on your MSI motherboard. Remember to save the changes before exiting the BIOS to ensure that the modifications take effect. Enjoy enhanced performance and stability with XMP enabled!
Enabling Xmp In Msi Click Bios 5
To enable XMP in MSI Click BIOS 5, simply update your BIOS to the latest version, then navigate to the BIOS settings and enable XMP. Click on the XMP profile that suits your needs, save the changes, and you’re good to go.
It’s a straightforward process that will optimize your memory performance.
If you have an MSI motherboard and want to get the most out of your memory performance, enabling XMP (Extreme Memory Profile) in MSI Click BIOS 5 is the way to go. XMP allows your RAM to run at higher frequencies and lower latencies, which can result in faster and more efficient performance. In this section, we’ll provide you with step-by-step instructions on how to enable XMP in MSI Click BIOS 5, as well as guide you on choosing the appropriate XMP profile for your system.
Step-by-step Instructions To Enable Xmp In Msi Click Bios 5
Before you start, ensure that your BIOS is updated to the latest version. This will ensure that you have access to all the latest features and improvements. Once you’ve confirmed that your BIOS is up to date, follow these steps:
- Restart your computer and enter the BIOS by pressing the designated key (usually DEL or F2) during the boot process. The exact key may vary depending on your motherboard model, so refer to your motherboard’s manual if needed.
- Navigate to the OC (Overclocking) tab using the arrow keys on your keyboard.
- Look for the XMP Profile option. This can usually be found under the Dram Timing Control, Memory, or Advanced Memory Settings sub-menu.
- Inside the XMP Profile option, you will see a list of available profiles. These profiles are preset configurations for your RAM that have been tested and optimized by the manufacturer.
- Choose the appropriate XMP profile for your system by highlighting it and pressing the Enter key.
- Once you’ve selected the XMP profile, you may be prompted to confirm the changes. Press Enter to confirm.
- Next, look for the Save & Exit option at the bottom of the BIOS screen. Select it and press Enter to save the changes and exit the BIOS.
Choosing The Appropriate Xmp Profile For Your System
When selecting the XMP profile for your system, it’s important to choose the one that matches the specifications of your RAM modules. The XMP profiles typically come in different variants, such as XMP-1, XMP-2, and so on. These variants correspond to different RAM speeds and timings.
To ensure optimal performance and stability, refer to your RAM’s specifications and choose the XMP profile that closely matches those specifications. For example, if your RAM is rated at 3200MHz with CL16 timings, look for an XMP profile that matches these values.
By enabling XMP in MSI Click BIOS 5 and choosing the appropriate XMP profile, you can unleash the full potential of your RAM and enhance your system’s performance. Take the time to explore the options available in your BIOS and make the necessary changes to optimize your memory performance.
Saving Changes And Rebooting
To enable XMP on MSI Click BIOS 5, start by updating your BIOS to the latest version. Then, navigate to the BIOS settings, locate the “XMP Profile” box, and select the desired profile. Save the changes and reboot your system for the new settings to take effect.
Saving The Changes Made In Msi Click Bios 5
Once you have made the necessary changes to enable XMP in MSI Click BIOS 5, it is important to save these changes to ensure they are applied to your system. Follow these steps to save the changes:
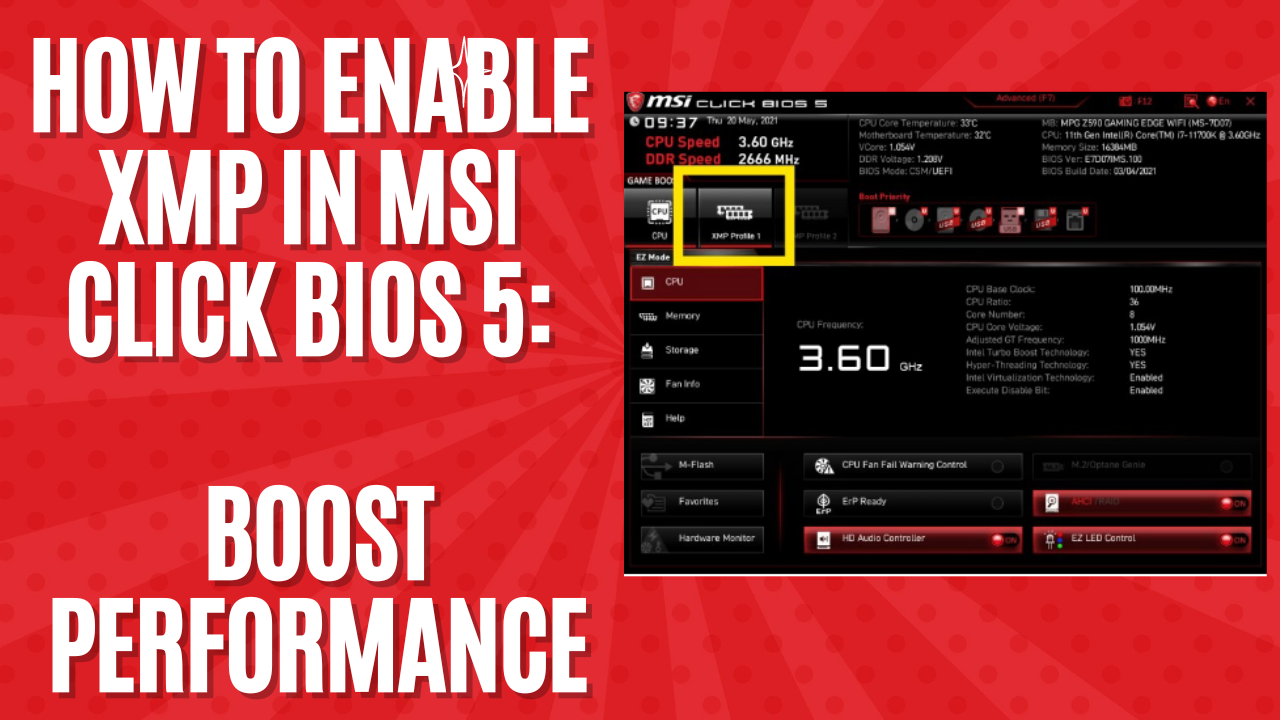
- Click on the XMP profile you wish to enable. Located at the top left corner of the BIOS settings, you will see a large box labeled “XMP Profile” with various numbers listed. Select the desired profile by clicking on it.
- In the upper right-hand corner of the BIOS settings, you will find an “X” button. Click on this button to close the BIOS settings.
- A confirmation message will appear, asking if you want to save the changes. Click on “Yes” to proceed with saving the changes.
By following these simple steps, you can ensure that the changes you made to enable XMP in MSI Click BIOS 5 are saved and will take effect in your system.
Rebooting The System For The Changes To Take Effect
After saving the changes made in MSI Click BIOS 5, it is necessary to reboot your system to apply these changes. When you reboot your system, the changes you made will be implemented and you will be able to experience the improved memory performance enabled by XMP. Follow these steps to reboot your system:
- Go to the toolbar at the top of your screen and click on the “Start” button.
- Select the option “Restart” from the drop-down menu.
- Your system will initiate the reboot process, applying the changes made in MSI Click BIOS 5.
Once your system has finished rebooting, the changes you made to enable XMP in MSI Click BIOS 5 will be fully applied and you will be able to enjoy the optimized memory performance. Rebooting your system is a crucial step in ensuring that the changes take effect, so don’t forget to follow these steps for a seamless experience.
Credit: forum-en.msi.com
Verifying Xmp Settings And Performance Boost
To enable XMP in MSI Click BIOS 5, first, update your BIOS to the latest version. Then, navigate to the BIOS settings and select the XMP profile that suits your needs. Save the changes, and you’ll experience a performance boost in your system.
How To Verify That Xmp Is Enabled In Msi Click Bios 5
- Access MSI Click BIOS 5 by restarting your computer and pressing the designated key, typically “Delete,” during the boot process.
- Navigate to the “OC” (Overclocking) tab using the arrow keys on your keyboard.
- Look for the “Memory-Z” option and select it by pressing Enter.
- In the “Memory-Z” window, you will find detailed information about your memory modules.
- Check for the “XMP” (Extreme Memory Profile) field, which should display the XMP profile number you have selected.
- If the “XMP” field is empty or shows a different value, it means that XMP is not enabled. In this case, press Enter on the “XMP Profile” field, select the desired XMP profile, and save the changes by following the on-screen prompts.
- After saving the changes, restart your computer to finalize the XMP settings.
- Once your computer restarts, repeat steps 1 to 5 to verify that the correct XMP profile is now displayed in the “Memory-Z” window. If it matches the selected profile, XMP is successfully enabled.
Testing The Performance Boost Achieved With Xmp Enabled
Enabling XMP in MSI Click BIOS 5 allows your system to utilize the full potential of your memory modules, leading to improved performance and faster data processing. Here’s how you can test the performance boost achieved with XMP enabled:- Before starting the test, ensure that XMP is enabled in MSI Click BIOS 5, as discussed in the previous section.
- Choose a benchmarking tool to measure the performance of your system. There are several options available, such as CPU-Z, AIDA64, or Geekbench.
- Run the benchmarking tool and record the results without XMP enabled.
- Once you have the baseline performance, go back to MSI Click BIOS 5 and select a different XMP profile or manually adjust the memory frequency and timings to achieve a higher performance setting.
- Save the changes in MSI Click BIOS 5 and restart your computer.
- Run the benchmarking tool again and compare the results with the baseline performance.
- If the performance has improved, it indicates that XMP has successfully enhanced the memory performance. You can now enjoy the increased speed and overall system responsiveness.
- Repeat the benchmarking test with different XMP profiles or manually adjusted memory settings to find the optimal configuration for your system.
Frequently Asked Questions Of How To Enable Xmp Msi Click Bios 5
How To Enable Xmp In Bios?
To enable XMP in BIOS, first ensure your BIOS is updated. Then, access your BIOS settings and find the XMP Profile option. Click on the desired XMP profile, save the changes, and restart your system.
How Do I Enable Xmp On Msi Click Bios 5?
To enable XMP on MSI Click BIOS 5, follow these steps:
1. Update your BIOS to the latest version. 2. Enter the BIOS settings. 3. Look for the XMP Profile option in the top left corner. 4. Click on the XMP Profile option and choose one of the available profiles. 5. Save the changes and restart your system.
What Is Xmp In Msi Click Bios 5?
XMP (eXtreme Memory Profile) is a feature in MSI Click BIOS 5 that allows you to easily overclock your RAM for better performance. It automatically adjusts the settings in your BIOS to optimize the memory speed and timings, making it faster than the default settings.
Why Should I Enable Xmp In Msi Click Bios 5?
Enabling XMP in MSI Click BIOS 5 offers several benefits. It allows you to achieve higher memory speeds, which can result in improved overall system performance. XMP also optimizes the timings of your RAM, making it more efficient. It’s particularly useful for gamers and content creators who require fast and responsive systems.
Conclusion
Enabling XMP on your MSI Click BIOS 5 is a simple yet essential step to optimize your motherboard’s memory performance. By following the steps mentioned in this blog post, you can easily access the XMP profile and make the necessary changes to enhance your system’s speed and stability.
It is crucial to keep your BIOS updated to the latest version before enabling XMP. Don’t forget to save the changes after selecting the desired XMP profile for a seamless experience. Take your performance to the next level with XMP on your MSI motherboard!


Leave a Reply