
To enable XMP and run your RAM at full speed, first open the Task Manager on Windows by either searching under Settings or right-clicking on the bottom taskbar and selecting Task Manager. Then, click on the Performance tab and select Memory from the left rail.
In the main part of the window, you’ll find the Speed option where you can enable XMP. This will ensure that your RAM is running at its maximum speed for optimal performance. Additionally, activating XMP can be done in the BIOS settings by locating the RAM settings and choosing the XMP profile that matches your RAM’s specifications.
By doing this, you’ll be able to fully utilize the speed potential of your RAM.
Credit: linustechtips.com
What Is Xmp And Why It Matters
When it comes to maximizing the performance of your computer’s RAM, XMP (eXtreme Memory Profile) is an essential tool. XMP allows you to unlock the full potential of your RAM by enabling it to run at its specified manufacturer speed, rather than the default speed set by your computer’s BIOS. Enabling XMP can significantly improve the overall performance of your system, resulting in faster and more efficient multitasking, smoother gaming experiences, and quicker data processing.
Definition Of Xmp
XMP, or eXtreme Memory Profile, is an Intel technology that allows users to easily overclock and optimize their RAM speed. It is a feature found in the BIOS (Basic Input/Output System) of your computer, which is responsible for controlling various hardware settings. By enabling XMP, you are essentially telling your BIOS to utilize the optimal settings for your RAM, ensuring it runs at the highest speed supported by the manufacturer.
Benefits Of Enabling Xmp For Ram Speed
Enabling XMP for your RAM speed offers a range of benefits that can greatly enhance your computer’s performance. Here are some key advantages:
- Faster multitasking: With XMP enabled, your RAM runs at its maximum speed, allowing for smoother multitasking. Whether you’re gaming while streaming, editing large files, or running multiple applications simultaneously, your system can handle it more efficiently.
- Improved gaming experience: Gamers, rejoice! Enabling XMP can significantly reduce loading times, minimize lag, and improve overall gaming performance. You’ll experience faster frame rates, smoother gameplay, and quicker responsiveness.
- Quicker data processing: XMP ensures that your RAM operates at its full potential, meaning faster data access and manipulation. This leads to quicker file transfers, faster rendering times, and improved overall system responsiveness.
- Optimal performance for high-demand applications: If you regularly use resource-intensive software such as video editing tools, graphic design programs, or data analysis software, enabling XMP can help ensure optimal performance. Your RAM will have the necessary speed to handle these applications seamlessly.
So, if you want to unlock the full power of your RAM and experience a noticeable boost in your computer’s performance, enabling XMP is the way to go. It’s a simple yet effective way to maximize your RAM speed and optimize your system’s capabilities.
Checking Compatibility And Bios Support
To enable XMP and run your RAM at full speed, start by opening the Performance tab and selecting Memory from the left rail. Then, in the main window, locate the Speed option. You can also access the Task Manager on Windows or refer to specific tutorials on YouTube and PCWorld for a full guide on how to optimize your RAM speed.
Don’t miss out on maximizing your RAM’s potential!
Verify Motherboard Compatibility For Xmp |
Before diving into enabling XMP to run your RAM at full speed, it is crucial to check if your motherboard supports XMP. Not all motherboards are compatible with XMP, so it is essential to verify this compatibility before making any changes in the BIOS. Running incompatible RAM settings could lead to system instability or even potential damage to your hardware.
How To Identify Xmp Support In Bios
Now that you have confirmed your motherboard’s compatibility for XMP, the next step is identifying the XMP support in your BIOS. Here’s a step-by-step guide on how to do it:
- Start your computer and enter the BIOS setup by pressing the designated key during the boot process, usually displayed on the screen.
- Navigate through the BIOS menu using the arrow keys on your keyboard. Different BIOS interfaces may have varying menu navigation.
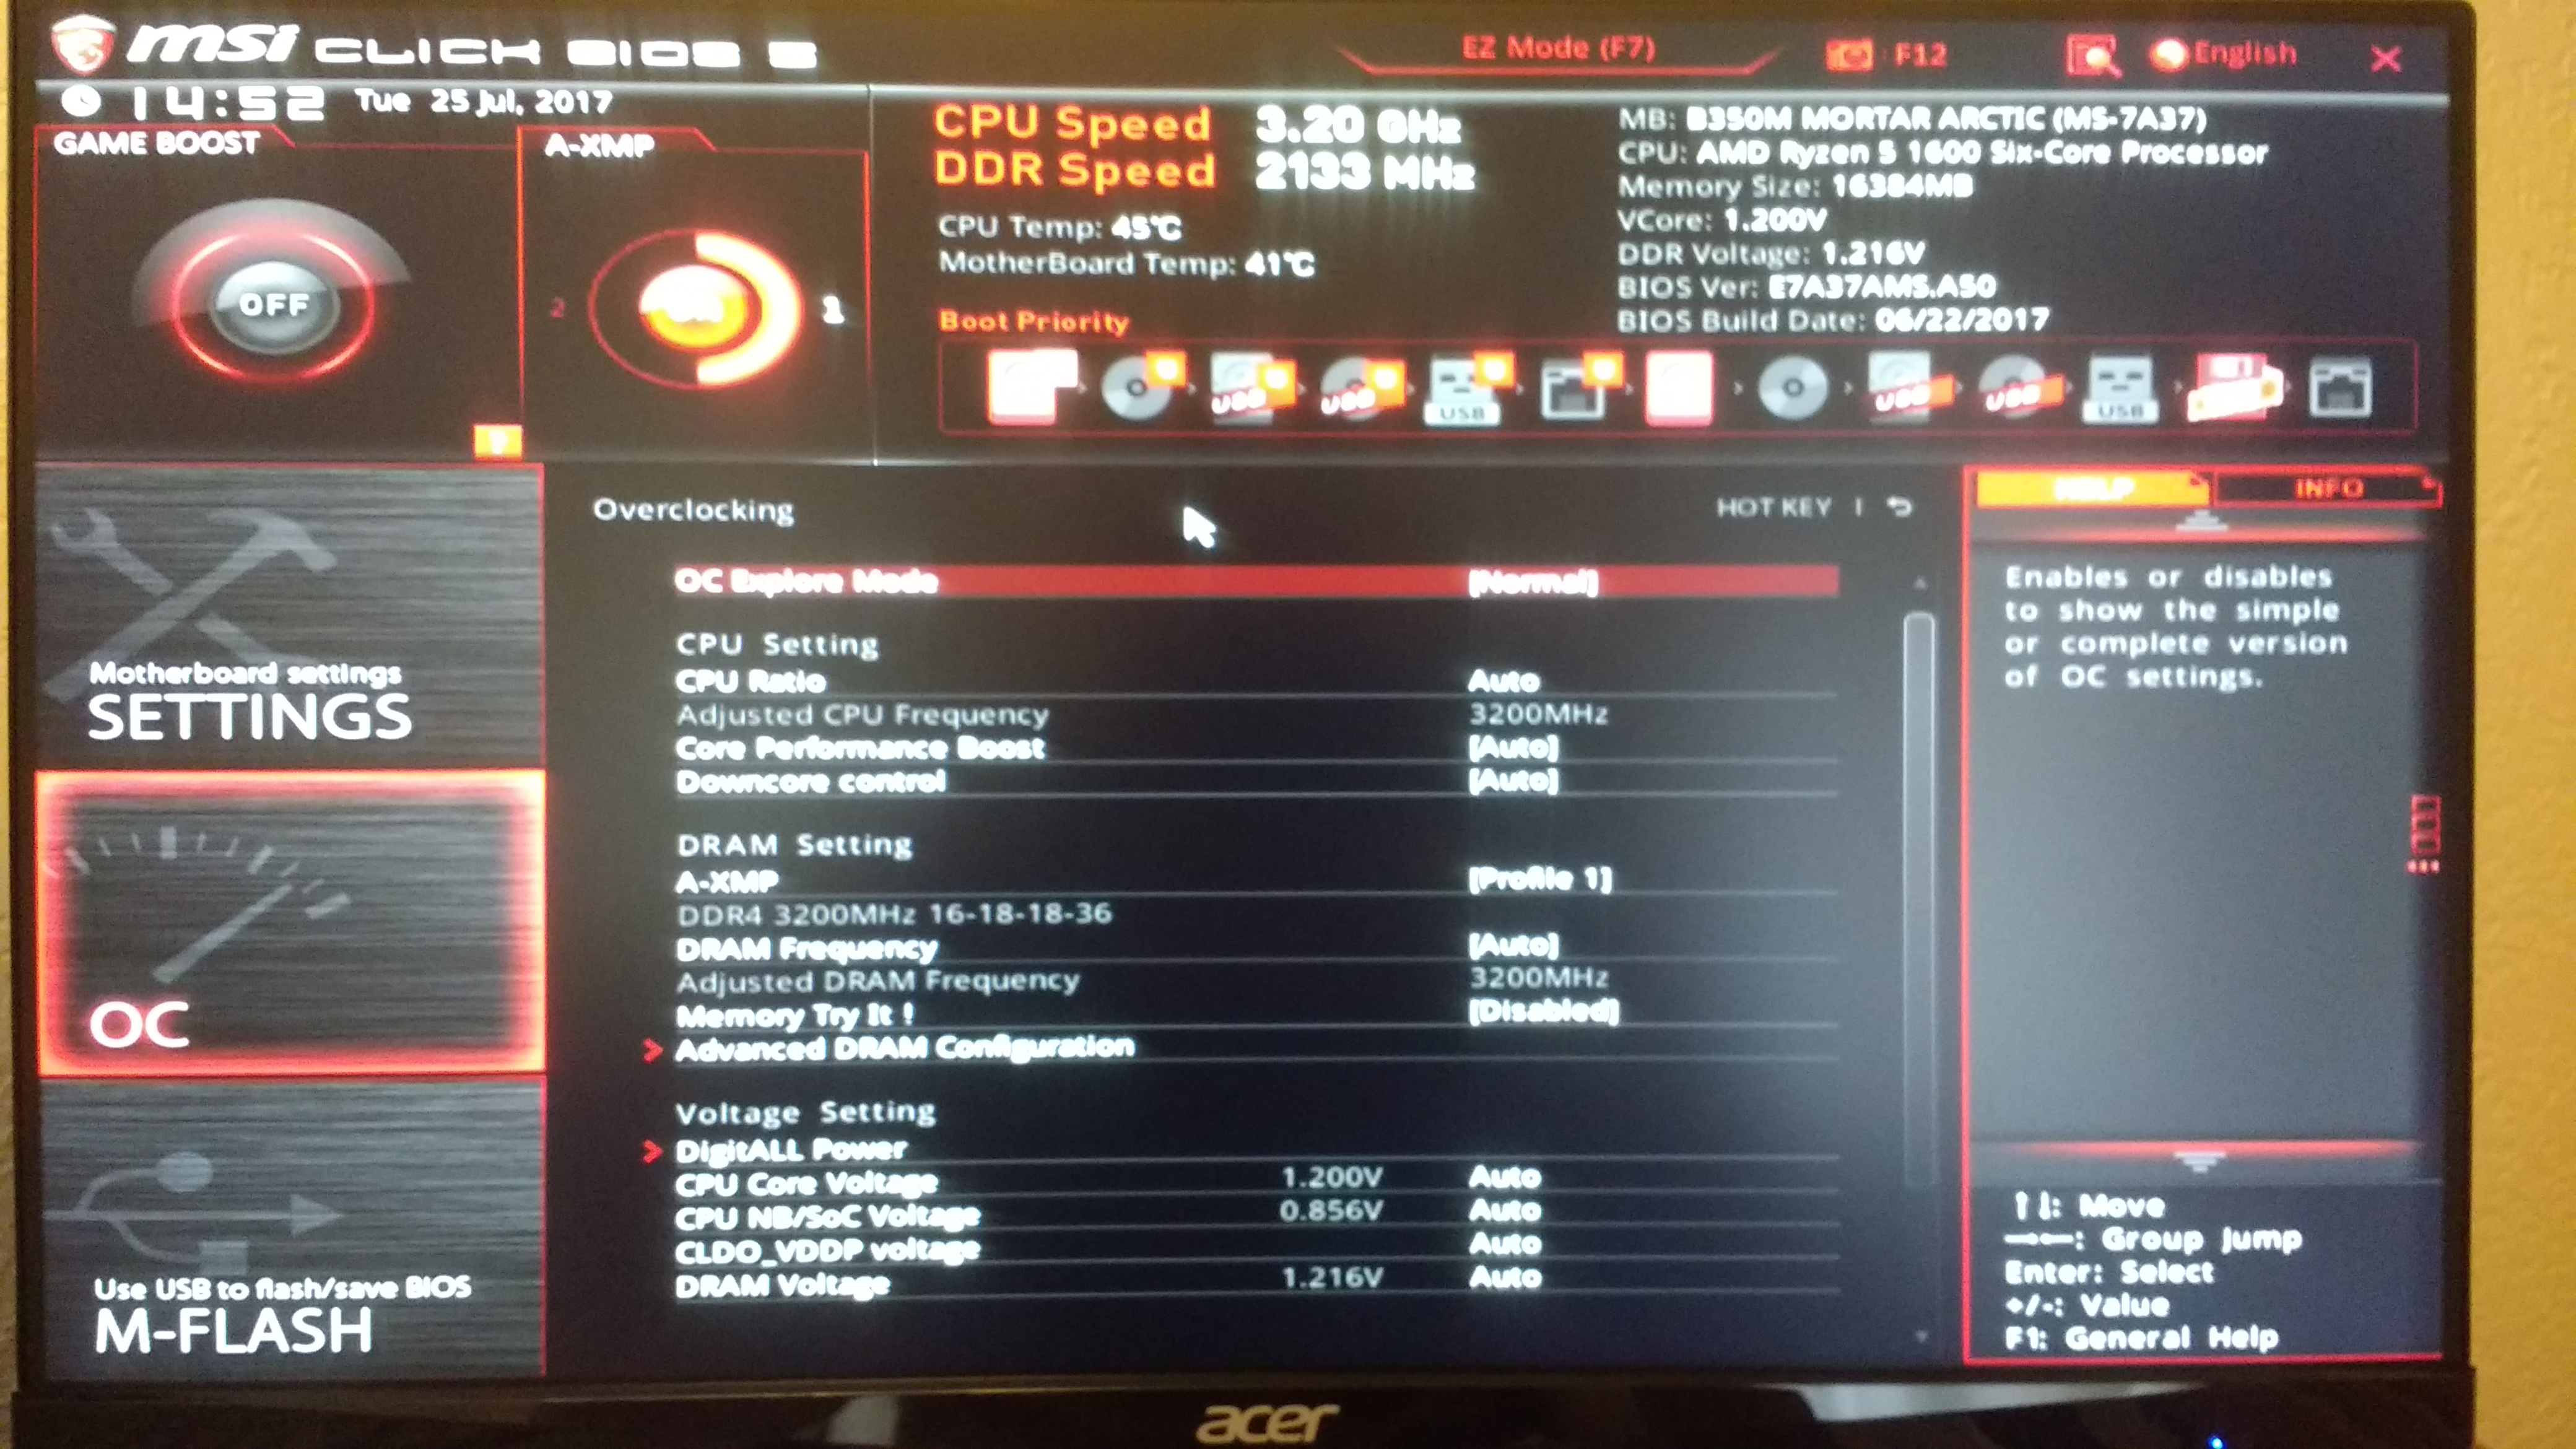
- Look for the overclocking or performance settings. The location of these settings may differ based on your motherboard’s BIOS layout.
- Once you locate the overclocking or performance settings, search for the XMP (Extreme Memory Profile) option. This option allows you to enable XMP and maximize your RAM’s performance.
If you find the XMP option, congratulations! Your BIOS supports XMP, and you can proceed with enabling it. However, if you cannot locate the XMP option or find any mention of XMP in the BIOS, it means your motherboard may not support XMP, or the option might be named differently. In such cases, you can refer to your motherboard’s user manual or contact the manufacturer’s support for further assistance.
Now that you have verified your motherboard’s compatibility for XMP and identified XMP support in your BIOS, you are ready to enable XMP and unleash the full speed of your RAM!
Enabling Xmp In Bios
Enabling XMP (Extreme Memory Profile) in BIOS allows your RAM to run at its full speed, ensuring optimal performance for your system. By default, your RAM may not be operating at its maximum speed, but with XMP, you can unlock its full potential. Here’s a step-by-step guide on how to enable XMP in BIOS.
Accessing Bios Settings
To enable XMP, you need to access the BIOS settings on your computer. Follow the steps below to enter the BIOS:
- Start by restarting your computer. While it’s booting up, look for the key you need to press to enter the BIOS setup. This key varies depending on the manufacturer, but common keys include F2, F12, or Delete. It’s usually displayed on the screen during startup.
- Once you identify the key, press it repeatedly until the BIOS setup screen appears. Be careful not to hold the key down for too long, as it may cause your computer to restart or display an error message.
Locating Xmp Option In Bios
After accessing the BIOS settings, you’ll need to locate the XMP option. The exact location of this option may differ based on your computer’s BIOS version and manufacturer. However, the following steps should help you find it:
- Look for a tab or menu labeled “Advanced” or “Overclocking.”
- Within this menu, you should see a section related to memory settings.
- Navigate through the submenus or options until you find the XMP option. It may be labeled as “Memory Profile,” “DRAM Timing Control,” or something similar.
- Select the XMP profile that corresponds to your RAM’s rated speed. Usually, there are multiple XMP profiles available, so choose the one that matches your RAM’s speed specifications.
Step-by-step Guide To Enabling Xmp In Bios
Now that we have located the XMP option, let’s enable it by following these steps:
- Highlight the XMP option using the arrow keys on your keyboard.
- Press Enter to access the available XMP profiles.
- Select the desired XMP profile that matches your RAM’s rated speed.
- Save the changes and exit the BIOS settings. This can usually be done by pressing the F10 key or following the on-screen instructions.
Once you’ve completed these steps, the XMP profile will be enabled, and your RAM will now run at its full speed. This can result in improved system performance and responsiveness.
Remember, enabling XMP is only recommended if you have RAM modules specifically designed to run at higher speeds. If your RAM is not compatible or stable at higher frequencies, it may cause system instability. Always refer to your motherboard’s manual or consult with the manufacturer’s website for compatibility information.
Verifying Xmp Profile And Ram Speed
Learn how to verify the XMP profile and run your RAM at full speed in just a few simple steps. With options like enabling XMP in the BIOS and adjusting RAM speed settings, you can maximize the performance of your memory for a smoother computing experience.
Ensuring Xmp Profile Activation
To run your RAM at its full potential, it is crucial to activate the XMP (Extreme Memory Profile) profile in your computer’s BIOS (Basic Input/Output System). This profile allows your RAM modules to operate at their designated speed and timings, ensuring optimal performance. Here’s how you can ensure XMP profile activation:
- Start your computer and access the BIOS settings by pressing the designated key during the boot process (usually Del, F2, or F12). Consult your motherboard’s manual for the specific key.
- Navigate to the “Memory” or “DRAM” settings section in the BIOS.
- Look for an option related to XMP profiles. It may be labeled as “XMP Profile,” “Memory Profile,” or something similar.
- Select the appropriate XMP profile that matches the specifications of your RAM. You can usually find this information on the RAM packaging or by checking the manufacturer’s website.
- Save the changes and exit the BIOS. Your computer will reboot with the XMP profile activated.
Checking Ram Speed In Windows
Once you have enabled the XMP profile in your BIOS, it’s important to verify that your RAM is running at the expected speed. Here’s how you can check the RAM speed in Windows:
- Open the Task Manager by either doing a quick search in the Windows Settings or right-clicking on the bottom taskbar and selecting “Task Manager.”
- Click on the “Performance” tab.
- In the left rail, select “Memory.”
- In the main part of the window, you will see the “Speed” section displaying the current speed of your RAM.
By following these steps, you can ensure that your XMP profile is activated and your RAM is running at its full speed. Remember, enabling XMP and verifying RAM speed can significantly improve your system’s performance, allowing for smoother multitasking and faster data access.
Troubleshooting Xmp Issues
Enabling XMP (eXtreme Memory Profile) is a great way to make sure that your RAM is running at its full speed and getting the most out of your system’s performance. However, sometimes you may encounter common problems when enabling XMP. This section will discuss these issues and provide troubleshooting steps to help you get XMP running smoothly.
Common Problems With Enabling Xmp
Enabling XMP can sometimes lead to stability issues or cause your system to fail to boot. Here are some common problems you may encounter:
- Inability to boot: After enabling XMP, your computer may fail to boot properly. This can be due to incompatible settings or unsupported RAM modules.
- Random crashes or system instability: Enabling XMP can sometimes result in random crashes or system instability, causing your computer to freeze or restart unexpectedly.
- Compatibility issues: XMP profiles may not be available for all RAM modules, or your motherboard may not fully support all XMP profiles. This can lead to compatibility issues when trying to enable XMP.
Troubleshooting Steps For Xmp Related Issues
If you are experiencing any of the aforementioned problems, here are some troubleshooting steps you can take to resolve XMP related issues:
- Update your motherboard BIOS: Ensure that you have the latest BIOS version installed on your motherboard. Manufacturers often release updates to improve compatibility with RAM modules and XMP profiles.
- Reset the BIOS settings: Sometimes, incorrect BIOS settings can cause issues with XMP. Resetting the BIOS to its default settings can help resolve compatibility problems.
- Check RAM compatibility: Verify that your RAM modules are compatible with the XMP profile you are trying to enable. Check the manufacturer’s website or documentation for compatibility information.
- Manually configure RAM settings: If enabling XMP is causing stability issues, you can try manually configuring the RAM settings like frequency, timings, and voltage. Refer to your motherboard’s manual for guidance.
- Test each RAM stick individually: In case of random crashes or system instability, test each RAM stick individually to identify if any specific stick is causing the issue.
By following these troubleshooting steps, you can overcome common problems with enabling XMP and ensure that your RAM is running at its full speed, maximizing your system’s performance.
Other Considerations For Ram Speed Optimization
Enabling XMP is a great way to ensure that your RAM is running at its full speed. However, there are other factors that can affect RAM performance and additional techniques that can further optimize your RAM speed. Understanding these factors and implementing the right techniques can give your system an extra boost in speed and enhance overall performance.
Factors Affecting Ram Performance
When it comes to RAM speed optimization, it’s essential to consider the following factors:
- Type of RAM: Different types of RAM have varying speed capabilities. DDR3, DDR4, and DDR5 are some of the commonly used RAM types, with each offering different data transfer rates. Upgrading to a faster RAM type can significantly improve performance.
- RAM Frequency: RAM frequency, also known as clock speed, measures how many data transfers per second the RAM module can handle. A higher frequency means faster data transfer, resulting in improved system responsiveness.
- Timing: RAM timing refers to the delay it takes for the RAM module to respond to read and write commands. Lower timing values result in faster response times.
- Capacity: The amount of RAM installed in your system can affect multitasking capabilities and overall performance. Having enough RAM is crucial to prevent bottlenecks and ensure smooth operation of resource-intensive applications.
- Dual-channel vs. Single-channel: Dual-channel memory provides faster data transfer rates compared to single-channel memory. Utilizing dual-channel configuration by installing RAM sticks in pairs can boost performance.
Additional Techniques To Optimize Ram Speed
In addition to enabling XMP, here are some additional techniques to further enhance your RAM speed:
- Overclocking: By increasing the voltage and frequency settings in BIOS, you can overclock your RAM, pushing it to operate at higher speeds than its default configuration. However, overclocking should be done cautiously to avoid instability or damage to your system.
- Clean the RAM slots: Over time, dust and debris can accumulate in the RAM slots, causing poor contact and reduced performance. Carefully clean the slots using compressed air to ensure optimal connectivity.
- Update BIOS: Keeping your system’s BIOS up to date can provide better compatibility and performance enhancements for your RAM modules.
- Proper cooling: High temperatures can negatively impact RAM performance. Ensure proper cooling for your system, such as using fans or liquid cooling solutions, to prevent overheating and maintain optimal RAM speeds.
- Use high-quality RAM: Investing in reputable brands and high-quality RAM modules can make a noticeable difference in performance. Cheaper or generic RAM may not deliver optimal speeds and stability.
By considering these factors and implementing additional techniques, you can optimize your RAM speed even further, allowing your system to perform at its best.
Frequently Asked Questions On How To Enable Xmp To Run Your Ram At Full Speed
How Do I Make My Ram Run At Full Speed In Bios?
To make your RAM run at full speed in BIOS, follow these steps: 1. Enable XMP in BIOS settings. 2. Go to the Performance tab and select Memory. 3. Check the Speed section to ensure it is set at the desired speed.
4. Use the Task Manager on Windows to verify RAM speed. 5. Adjust RAM speed if necessary.
How Do I Make Sure My Ram Is Running At The Right Speed?
To ensure your RAM is running at the correct speed, follow these steps: 1. Search for “How to enable XMP to run your RAM at full speed” on Google. 2. Click on the PCWorld or Digital Trends link for a detailed guide.
3. Access the Performance or Task Manager on your device. 4. Look for the Memory tab or section. 5. Enable XMP to optimize your RAM speed. 6. Save changes in BIOS/UEFI settings if necessary. By enabling XMP, you can maximize your RAM’s performance and ensure it runs at its intended speed.
Why Is My Ram 3200mhz But Running At 2400?
To run your RAM at its full speed of 3200MHz, you need to enable XMP (Extreme Memory Profile) in your computer’s BIOS settings. XMP allows the RAM to operate at its advertised speed, which is faster than the default speed of 2400MHz.
By enabling XMP, you can maximize the performance of your RAM.
How Do I Maximize My Ram Speed?
To maximize your RAM speed, follow these steps: 1. Enable XMP in your BIOS settings. 2. Go to the Performance tab in the Task Manager (on Windows) or search in Settings. 3. Select Memory and check the Speed. 4. Adjust the RAM speed settings in your BIOS or UEFI.
5. Make sure your RAM is running at the correct speed. Remember to avoid starting sentences with certain phrases and write in active voice. Additionally, ensure that your writing is unique and easy to understand.
Conclusion
Enabling XMP to run your RAM at full speed is an essential step in optimizing your PC’s performance. By following the easy-to-understand guides provided by PCWorld, Digital Trends, and Beebom, you can access your computer’s BIOS settings and make the necessary adjustments.
Additionally, YouTube tutorials such as those from Linus Tech Tips and YouTube Algorithm will further assist you in successfully enabling XMP. Take control of your RAM speed and unlock the full potential of your system with these helpful resources. Remember to always consult your motherboard’s manual for specific instructions to ensure smooth execution.


Leave a Reply