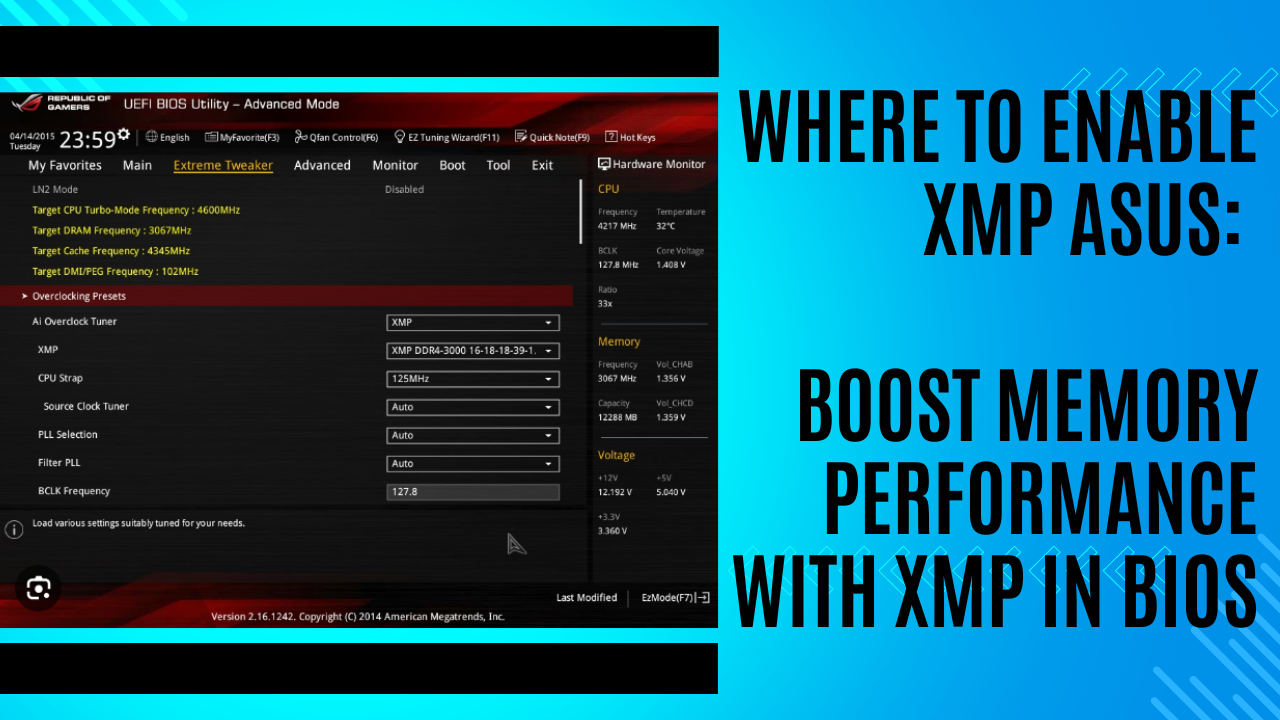
To enable XMP on an ASUS motherboard, go to the ADVANCED Mode in your BIOS, navigate to the AI TWEAKER tab, and look for the AI OVERCLOCK TUNER option. Set it to the desired XMP profile for optimized memory performance.
Some motherboards may not have the option to enable XMP, in which case upgrading the motherboard might be necessary.
Accessing Bios On Asus Motherboard
To enable XMP on an ASUS motherboard, go into the BIOS settings by entering the advanced mode. Navigate to the AI Tweaker tab, locate the AI Overclock Tuner, and enable XMP from there. This will optimize the memory performance and allow for a better gaming experience.
Navigating To The Bios Setup On Asus Motherboards
To access the BIOS setup on your ASUS motherboard, you will need to reboot your computer. As soon as your computer starts booting up, press the designated key to enter the BIOS. The key varies depending on the motherboard model, but commonly used keys are Delete, F2, or F10. If you’re unsure, you can check your motherboard manual or the ASUS website for the specific key.
Entering The Advanced Mode In Bios
Once you enter the BIOS, you will be greeted with a menu. Here, you need to navigate to the ADVANCED tab or menu. This is generally located at the top of the menu. Use the arrow keys on your keyboard to move through the menu and select the ADVANCED tab.
Finding The Ai Tweaker Tab In Bios
Within the ADVANCED menu, you will find various submenus. Look for the AI TWEAKER tab and select it. The AI TWEAKER tab is where you can make changes to the settings related to overclocking and performance optimization for your ASUS motherboard.
Once you are in the AI TWEAKER tab, you can start making adjustments to enable XMP for your memory modules. Look for options such as “XMP Profile,” “DOCP,” or “Memory Overclocking.” Keep in mind that the exact wording may vary depending on your motherboard model.
When you find the XMP option, select it and enable it. This will activate the XMP (eXtreme Memory Profile) for your memory modules, allowing them to operate at their optimal settings. Once enabled, make sure to save the changes and exit the BIOS setup.
Credit: www.reddit.com
Enabling Xmp In Bios
Enabling XMP in BIOS is a crucial step for optimizing the performance of your Asus motherboard. By enabling XMP (Extreme Memory Profile), you can unlock the full potential of your RAM and achieve faster speeds. Let’s explore the process step by step.
Locating The Ai Overclock Tuner In The Ai Tweaker Tab
To enable XMP, you need to navigate to the AI TWEAKER tab in the BIOS. Here’s how you can locate the AI OVERCLOCK TUNER:
- Boot your computer and enter the BIOS setup by pressing the designated key (usually Delete or F2) during the startup process.
- Once inside the BIOS, switch to the ADVANCED mode.
- Find and select the AI TWEAKER tab.
- Scroll down until you locate the AI OVERCLOCK TUNER option.
Choosing The Xmp Profile Option
Now that you have located the AI OVERCLOCK TUNER, it’s time to select the XMP profile option. Follow these steps:
- Click on the AI OVERCLOCK TUNER option to access its settings.
- You will see a dropdown menu with different options. Look for the XMP profile option.
- Select the XMP profile that matches the specifications of your RAM. Typically, there are multiple profiles available, such as XMP 1.0, XMP 2.0, or higher.
Adjusting Memory Settings For Optimal Performance
Now that you have chosen the XMP profile, it’s important to adjust the memory settings for optimal performance. Here’s how:
- Navigate to the memory settings within the AI TWEAKER tab.
- Depending on your specific motherboard model, you may have options like memory frequency, timings, and voltage. Modify these settings according to the specifications of your RAM.
- Refer to your RAM manufacturer’s specifications for the recommended values for each setting. Make sure to enter the values correctly to avoid any instability or compatibility issues.
By enabling XMP and adjusting the memory settings, you can unleash the full potential of your RAM and enjoy improved system performance. Remember to save your changes before exiting the BIOS setup. Get ready to experience faster speeds and enhanced multitasking capabilities.
Troubleshooting Xmp Activation
To enable XMP on an Asus motherboard, go to the Advanced Mode in your BIOS and navigate to the AI Tweaker tab. Look for the AI Overclock Tuner option, where you can enable XMP to optimize memory performance. If you can’t find the option, it may not be available on your motherboard, and you may need to upgrade to a motherboard that supports XMP.
Reasons Why Xmp May Not Be Available In Bios
If you’ve been searching for the XMP option in your ASUS BIOS without any luck, there could be a few reasons behind this frustration. Below, we explore some possible causes for why XMP may not be available in your BIOS settings.1. Motherboard Limitations
Sometimes, certain motherboard models may not support XMP, which means the option to enable it simply won’t be available in the BIOS. If your motherboard lacks this feature, you may need to consider upgrading to a newer model that does support XMP.2. BIOS Version
Another reason for the absence of the XMP option in your ASUS BIOS could be an outdated version of the BIOS. It’s essential to ensure that you have the latest BIOS version installed, as manufacturers often release updates that introduce new features and functionalities, including XMP support. Check the official ASUS website for the latest BIOS updates specific to your motherboard model.3. CPU Compatibility
In some cases, the CPU you’re using may not support XMP, which could explain the absence of the option in the BIOS. Check the specifications of your CPU to confirm whether XMP is supported. If it’s not, you won’t be able to enable XMP on your system.Exploring Alternative Methods To Enable Xmp Without Bios Options
If you’re unable to find the XMP option in your ASUS BIOS, don’t worry. There might still be alternative ways to enable XMP and optimize your memory performance. Here are a few methods you can explore:1. Software Overclocking Utilities
Some motherboard manufacturers, including ASUS, provide software utilities that allow you to overclock your memory without accessing the BIOS. These utilities often come with user-friendly interfaces that make it easy to enable XMP and fine-tune memory settings. Check the ASUS website or refer to your motherboard’s user manual to see if such a utility is available for your motherboard model.2. Memory Manufacturer Software
Certain memory manufacturers offer their own software solutions that allow for memory overclocking and XMP profile enabling. These software packages typically come with intuitive interfaces and are designed to work seamlessly with their respective memory modules. Check the website of your memory manufacturer to see if they provide any overclocking software that supports XMP.3. Consultation with Experts
If you’ve exhausted all alternative methods and are still unable to enable XMP, it may be worth consulting with hardware experts or reaching out to ASUS customer support. They might be able to provide additional guidance or shed light on any possible workarounds for your specific motherboard model.Considering Motherboard Limitations And Potential Upgrades
While it can be frustrating to discover that your motherboard lacks XMP support, it’s essential to consider the limitations imposed by the hardware. If XMP is crucial for your specific needs, upgrading to a motherboard that supports XMP might be the best option. However, before making any decisions, double-check the compatibility of the new motherboard with your current CPU and other components to ensure a smooth transition. Remember, XMP is designed to optimize memory performance and enhance your system’s overall speed. While it may provide a significant boost, it’s vital to weigh the benefits against the potential costs and complexities associated with upgrading your motherboard. By troubleshooting XMP activation, exploring alternative methods, and considering motherboard limitations and potential upgrades, you can ensure that you are making informed decisions to enhance your system’s performance.Benefits Of Xmp For Asus Motherboards
Enabling XMP (eXtreme Memory Profile) on ASUS motherboards can offer several benefits, enhancing your overall system performance and optimizing your memory capabilities. When you enable XMP, you unlock your RAM’s full potential and ensure its compatibility with your motherboard and CPU.
Optimizing Memory Performance And Stability
One of the main advantages of enabling XMP on ASUS motherboards is the optimization of memory performance and stability. XMP allows your motherboard to automatically configure the settings of your RAM, ensuring that it operates at its rated frequency and latency values.
The default BIOS settings may not fully utilize your RAM’s capabilities, leading to suboptimal performance. However, by enabling XMP, you can harness the full power of your RAM, resulting in faster data transfer rates, improved multitasking abilities, and smoother overall system performance.
Increasing System Speed And Responsiveness
Another significant benefit of enabling XMP on ASUS motherboards is the increase in system speed and responsiveness. By unlocking the full potential of your RAM, XMP allows for faster data access and improved load times for applications and games.
With XMP enabled, your system can handle resource-intensive tasks more efficiently, ensuring smoothness and responsiveness during demanding scenarios. Whether you’re gaming, editing videos, or running multiple virtual machines simultaneously, enabling XMP can greatly enhance your overall user experience.
Enhancing Gaming And Multitasking Experiences
XMP is particularly beneficial for gamers and multitaskers. By enabling XMP on ASUS motherboards, you can experience enhanced gaming performance with reduced lag and improved frame rates. This can provide a competitive edge in fast-paced games and ensure a smoother gaming experience overall.
In addition, enabling XMP can significantly improve multitasking capabilities. Whether you’re running resource-heavy applications, streaming, or handling large data sets, XMP allows for seamless switching between tasks and minimized slowdowns.
Overall, enabling XMP on ASUS motherboards can greatly enhance your memory performance, increase system speed and responsiveness, and provide an improved gaming and multitasking experience. By unlocking the full potential of your RAM, XMP ensures that your ASUS motherboard is running at its optimal capacity.
Frequently Asked Questions On Where To Enable Xmp Asus
How Do I Enable Xmp On My Asus?
To enable XMP on your Asus motherboard, follow these steps: 1. Enter the BIOS and go to the ADVANCED Mode. 2. Navigate to the AI TWEAKER tab. 3. Look for the AI OVERCLOCK TUNER option. 4. Select the desired XMP profile.
5. Save the changes and exit the BIOS. Note: Some motherboards may not support XMP, in which case you’ll need to upgrade your motherboard.
Where Do I Activate Xmp?
To activate XMP on an ASUS motherboard, go to the BIOS and enter the ADVANCED Mode. From there, navigate to the AI TWEAKER tab and locate the AI OVERCLOCK TUNER option. You can enable XMP in this section to optimize memory performance.
You can also search online for specific instructions and tutorials on enabling XMP on an ASUS motherboard.
Why Can’t I Find Xmp In My Bios?
Some motherboards do not support XMP, so you may not find the option in your BIOS. If it is not available or greyed out, upgrading your motherboard is the only solution.
How Do I Enable Xmp In Asus Bios Reddit?
To enable XMP in ASUS BIOS, go to the Advanced Mode in your BIOS and navigate to the AI Tweaker tab. Look for the AI Overclock Tuner setting and select the XMP profile for your memory. This will optimize your memory performance.
Conclusion
To enable XMP on your Asus motherboard, you need to navigate to the BIOS settings. Enter the BIOS, select the AI Tweaker menu, and locate the Ai Overclock Tuner. Change the setting from manual to XMP, and you should be good to go.
Keep in mind that not all motherboards support XMP, so if you don’t see the option, you may need to upgrade your motherboard. Remember to always consult your motherboard’s manual for specific instructions. Happy overclocking!


Leave a Reply