To fix a CPU debug light, ensure that the CPU is properly installed and connected, check for any bent or broken pins on the CPU socket, reset the BIOS, remove and reconnect hardware components, and check the storage devices.
Credit: www.reddit.com
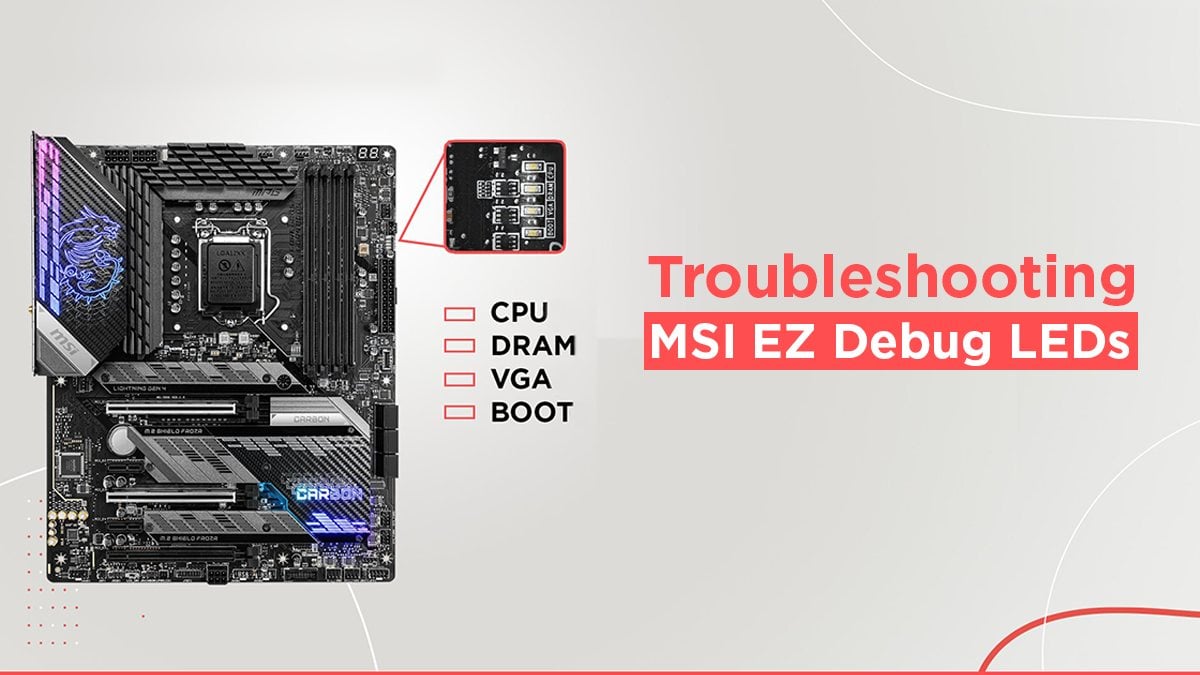
Understanding The Cpu Debug Light
Discover how to resolve the CPU debug light issue on your motherboard. Troubleshoot common causes such as improper CPU installation, faulty RAM, or bent pins on the CPU socket. Follow step-by-step guides to reset the BIOS, remove hardware, and check storage devices to fix the problem.
What Does The Cpu Debug Light Indicate?
The CPU debug light is a useful indicator on your motherboard that can provide valuable information about the health of your CPU (Central Processing Unit). When the CPU debug light is on, it typically indicates that there is a problem with the CPU or its connection to the motherboard.
Common Reasons For The Cpu Debug Light To Come On
There are several common reasons why the CPU debug light may come on. It’s essential to understand these potential issues to troubleshoot and fix the problem effectively.
- Improper CPU installation: If the CPU is not correctly installed, the debug light may come on. Ensure that the CPU is inserted into the socket correctly and that all the pins are aligned and undamaged.
- Failed CPU: In some cases, the CPU itself may have failed, leading to the CPU debug light coming on. If you suspect a failed CPU, you may need to replace it to resolve the issue.
- Power supply problems: Insufficient power supply or faulty power connections can also trigger the CPU debug light. Check that all power cables are securely connected, and your power supply is providing enough power for your CPU.
- BIOS issues: Outdated or incompatible BIOS versions can cause the CPU debug light to activate. Ensure that you have the latest BIOS version installed for your motherboard.
- Overheating: If the CPU is overheating, the debug light may come on as a protective measure. Ensure that your CPU cooler is properly installed and functioning correctly. Consider reapplying thermal paste if necessary.
By understanding these common reasons for the CPU debug light to come on, you can effectively diagnose and fix the issue. Remember to double-check all connections, consult your motherboard’s manual for specific troubleshooting steps, and seek professional assistance if needed.
Troubleshooting Steps
If you’re experiencing a CPU debug light on your motherboard, here are a few troubleshooting steps to fix it. Check if the CPU is properly installed, reset the BIOS, remove hardware, and inspect the storage devices. Disconnecting peripherals and connectors can also help resolve the issue.
Step 1: Check Cpu Installation
When your CPU debug light is on, the first thing you should do is check the CPU installation. This involves ensuring that the CPU is properly installed in the socket and that there are no bent or damaged pins. A poorly installed CPU or damaged pins can prevent the motherboard from detecting or properly communicating with the CPU. If you suspect an issue with the CPU installation, follow these steps to troubleshoot and fix the problem:- Ensure that the computer is turned off and unplugged.
- Gently remove the CPU cooler or heat sink to access the CPU socket.
- Inspect the CPU socket for any bent or damaged pins. If you notice any issues, you may need to carefully straighten them using a pair of tweezers or a small, non-metal tool.
- Remove the CPU from the socket and examine it for any visible damage. If the CPU appears to be damaged, you may need to replace it.
- Reinstall the CPU into the socket, making sure it is properly aligned. Refer to your motherboard’s manual for specific installation instructions.
- Secure the CPU in place by locking the socket lever.
- Reattach the CPU cooler or heat sink, ensuring that it is properly seated and secured.
- Plug in and turn on your computer to see if the CPU debug light issue is resolved.
Step 2: Verify Ram Installation
Another common cause of a CPU debug light is an issue with the RAM installation. If the RAM is not properly installed or if there are loose connections, it can prevent the CPU from functioning correctly. Follow these steps to verify the RAM installation:- Shut down your computer and unplug it from the power source.
- Open your computer case to access the RAM slots.
- Check each RAM module to ensure it is firmly seated in its slot. Gently push down on each module to make sure it is securely in place.
- Inspect the connections between the RAM modules and the motherboard. If you notice any loose connections, remove the RAM modules and reinsert them firmly into the slots.
- Close your computer case and reconnect the power source.
- Turn on your computer and check if the CPU debug light is still on.
Step 3: Reset Bios Settings
Resetting the BIOS to default settings can help resolve issues related to incorrect configurations or corrupted settings. Here’s how you can reset BIOS settings:- Power off your computer and unplug it from the power source.
- Locate the clear CMOS jumper on your motherboard.
- Change the position of the CMOS jumper to clear the CMOS. Refer to your motherboard’s manual for the exact jumper position.
- Wait for a few seconds, then return the CMOS jumper to its original position.
- Reconnect the power source and turn on your computer.
- Access the BIOS menu by pressing the designated key during startup. The key varies depending on your motherboard manufacturer (common keys include F2, Del, or Esc).
- Restore the BIOS settings to their default configuration by selecting the “Load Default Settings” or similar option in the BIOS menu.
- Save the changes and exit the BIOS menu.
- Check if the CPU debug light issue is resolved.
Step 4: Check Power Supply
Insufficient power supply or loose power cables can cause the CPU debug light to come on. Follow these steps to check the power supply:- Turn off your computer and unplug it from the power source.
- Open your computer case and locate the power cables connected to the motherboard, particularly the CPU power connector (usually a 4-pin or 8-pin connector).
- Ensure that all power cables are securely and properly connected to their respective connectors on the motherboard.
- Inspect the cables for any signs of damage. If you notice any frayed cables or loose connectors, consider replacing them.
- Close your computer case and reconnect the power source.
- Turn on your computer and check if the CPU debug light is still on.
Step 5: Test With Different Components
If the CPU debug light issue persists, it may be necessary to test with different components to narrow down the problem. This step involves swapping out the CPU and RAM if possible to identify if the issue lies with these components. Follow these steps:- Power off your computer and unplug it from the power source.
- Remove the CPU and RAM modules from your motherboard.
- If you have access to spare or compatible components, install them into your motherboard.
- Reconnect the power source and turn on your computer.
- Check if the CPU debug light is still on with the different components installed.
- If the CPU debug light persists, it may indicate a motherboard or power supply issue. Consider seeking professional help.
Step 6: Seek Professional Help
If you have followed all the troubleshooting steps and the CPU debug light issue persists, it may be time to consider seeking assistance from a professional. Professional technicians have the experience and tools to diagnose and fix complex hardware issues. To find a reliable repair service, consider asking for recommendations from friends, checking online reviews, or contacting the manufacturer for authorized service centers.Prevention Tips
Looking for tips on how to fix CPU debug light issues? Check out these helpful suggestions to reset the BIOS, remove hardware, or check storage devices to resolve the problem. Additionally, make sure all peripherals and connectors are properly disconnected and reconnected.
Tips To Avoid Encountering Cpu Debug Light Issues
To ensure smooth functioning and prevent CPU debug light issues, it is essential to follow some best practices for CPU installation and maintenance. By adhering to these tips, you can minimize the chances of encountering debug light problems and enjoy a seamless computing experience.
Best Practices For Cpu Installation And Maintenance
Proper installation and regular maintenance play a crucial role in preventing CPU debug light issues. Here are some best practices to follow:
- Choose a compatible CPU: Before purchasing a CPU, make sure it is compatible with your motherboard. Refer to the manufacturer’s specifications or consult with a professional if needed.
- Handle the CPU with care: CPUs are delicate components, so it is important to handle them with care. Avoid touching the CPU pins or the golden contacts. Hold the CPU by its sides and place it gently into the socket in the correct orientation.
- Apply thermal paste correctly: Thermal paste helps in heat transfer between the CPU and the cooler. Apply a thin layer of thermal paste evenly on the CPU surface before installing the cooler. This will help in efficient heat dissipation and prevent overheating.
- Secure the CPU cooler: Ensure that the CPU cooler is firmly and evenly secured to the CPU socket. Improper installation can lead to poor cooling performance and overheating, triggering the CPU debug light.
- Keep the CPU and its surroundings clean: Regularly clean the CPU and its surroundings to prevent dust and debris buildup. Use compressed air or a soft brush to clean the CPU cooler and ensure proper airflow for efficient cooling.
- Monitor CPU temperatures: Keep an eye on the CPU temperatures using monitoring software. High temperatures can lead to instability and trigger the CPU debug light. If the temperatures are consistently high, consider upgrading the cooling system.
- Update drivers and BIOS: Regularly update your motherboard drivers and BIOS to ensure compatibility, stability, and bug fixes. Outdated drivers or BIOS can cause various issues, including CPU debug light problems.
- Check for bent or broken pins: Inspect the CPU socket for any bent or broken pins. Bent pins can cause connectivity issues and trigger the CPU debug light. If you find any bent pins, carefully straighten them using a razor blade or a fine tweezers.
By following these prevention tips and best practices for CPU installation and maintenance, you can significantly reduce the chances of encountering CPU debug light issues. Remember, prevention is always better than dealing with issues later on.
Frequently Asked Questions For How To Fix Cpu Debug Light
What Causes The Cpu Debug Light To Come On?
The CPU debug light typically comes on when there is an issue with the CPU. This can be due to the CPU not being detected or properly installed, or if it has failed.
How Do I Fix My Cpu Motherboard Light?
To fix your CPU motherboard light, try these steps: 1. Reset the BIOS. 2. Remove any hardware connected to the motherboard. 3. Replace the CMOS battery. 4. Check the storage devices. 5. Disconnect all peripherals and connectors. Make sure to follow these guidelines to fix the issue.
What Does Debug Led Mean On Motherboard?
The debug LED on a motherboard indicates issues related to the CPU or its socket. If the LED stays lit, there may be a problem with the CPU or its power supply. The LED can also indicate memory-related problems. Troubleshooting steps include checking for bent or broken pins and ensuring proper installation of the CPU.
Why Does My Cpu Light Stay On?
The CPU light stays on when the CPU is not detected or properly installed, or if it has failed. It could also be due to issues with the CPU fan or a dead CMOS battery. Resetting the BIOS, checking hardware connections, and disconnecting peripherals can help resolve the issue.
Conclusion
To fix the CPU debug light, there are a few steps you can take. First, try resetting the BIOS and removing any hardware. Check the storage devices and disconnect all peripherals. If the issue persists, it could be related to the CPU or its power supply.
Make sure the CPU is properly installed and that all pins are intact. Additionally, a dead CMOS battery can trigger the red light. By following these troubleshooting steps, you can resolve the CPU debug light issue and get your computer up and running smoothly.


Leave a Reply