To format an M2 SSD, access the Disk Management utility by right-clicking the Windows Start Button and selecting it. Locate the unallocated space for the drive and right-click it to choose “New Simple Volume”.
Follow the prompts to format the drive and customize your settings. Alternatively, some BIOS have a “secure erase” option under a dedicated tab which can be used to format the drive. Remember to properly initialize the disk in Disk Management if needed.
If you encounter any issues or want further assistance, you can find helpful tutorials and tools online from reputable sources like Crucial. com or Microsoft Learn.

Credit: www.wikihow.com
Using Disk Management Utility
To format an M2 SSD, you can use the Disk Management utility. Access it by right-clicking the Windows Start Button, then locate the unallocated space of the drive. Right-click and choose “New Simple Volume” to follow the formatting prompts and select your desired labels and settings.
Alternatively, some BIOS options may have a “secure erase” tab for formatting.
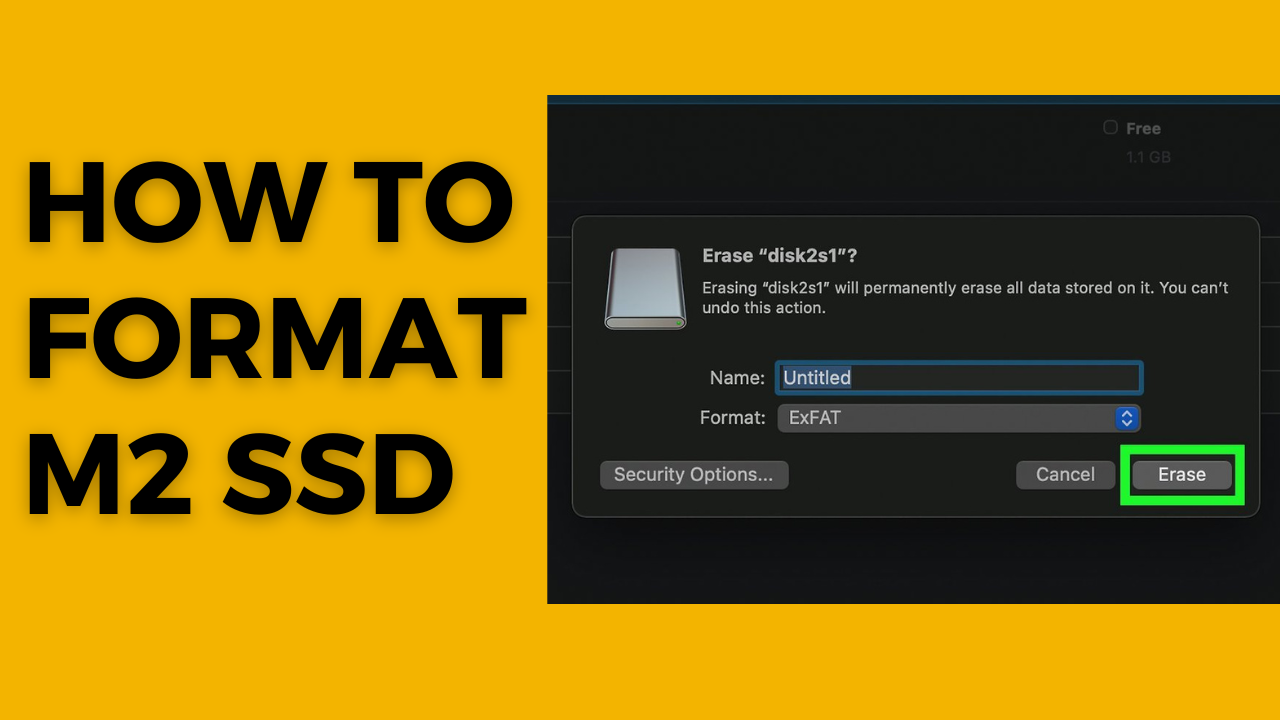
If you’re looking to format your M2 SSD, the Disk Management utility in Windows can be a handy tool. Here’s a step-by-step guide on how to format your M2 SSD using Disk Management:Access Disk Management Utility
To access the Disk Management utility, right-click the Windows Start Button and select “Disk Management” from the context menu. This will open the Disk Management window, where you’ll be able to see all the connected drives, including your M2 SSD.Locate The Unallocated Space
In the Disk Management window, you will see a list of all the drives connected to your system. Your M2 SSD will be labeled as unallocated space. Locate your M2 SSD in the list of drives and right-click on the unallocated space.Right Click And Choose “new Simple Volume”
After right-clicking on the unallocated space, a context menu will appear. From the menu, select “New Simple Volume” option. This will open the New Simple Volume Wizard, which will guide you through the formatting process.Follow Formatting Prompts And Choose Drive Labels And Settings
Once you’ve initiated the New Simple Volume Wizard, you’ll be prompted to choose the size of the volume and assign a drive letter to it. You can choose the maximum size available, or specify a custom size according to your needs. Additionally, you can assign a specific drive letter or let Windows allocate one automatically. In the next step, you’ll be asked to choose a file system for your M2 SSD. If the drive is primarily used on Windows systems, it is recommended to choose NTFS. However, if you plan to use the drive on other operating systems, you can select FAT32. Finally, you’ll be prompted to provide a volume label, which is the name that will be displayed for your M2 SSD in Windows Explorer. Choose a descriptive name that makes it easy for you to identify the drive. Once you’ve completed these steps, the formatting process will begin, and your M2 SSD will be formatted with the selected settings. After the process is complete, your drive will be ready for use. By following these steps, you can easily format your M2 SSD using the Disk Management utility in Windows. Ensure that you correctly follow each step to prevent any data loss or formatting errors.Formatting From Bios
If you’re looking to format your M2 SSD, one method you can use is formatting it from the BIOS. This is a straightforward process that allows you to erase all the data on your drive and start fresh. In this article, we’ll walk you through the steps to format your M2 SSD from the BIOS.
Access Bios Settings
The first step in formatting your M2 SSD from the BIOS is accessing the BIOS settings on your computer. Here’s how you can do it:
- Turn on your computer and press the designated key to enter the BIOS. The key may vary depending on your motherboard or computer manufacturer. Typically, it is the Delete, F2, or F12 key.
- Once you’re in the BIOS, navigate to the Storage or Advanced tab using the arrow keys.
Look For An Option Called “secure Erase”
After accessing the BIOS settings, you need to look for an option called “secure erase.” This option allows you to perform a secure erase on your M2 SSD, effectively wiping out all the data on the drive. Here’s how to find it:
- In the Storage or Advanced tab, look for a section related to your storage devices.
- Scroll through the options until you find the one that mentions “secure erase” or “erase SSD.”
Format The M2 Ssd From There
Once you’ve located the “secure erase” option, you can proceed to format your M2 SSD. Here are the steps to follow:
- Select the “secure erase” option using the arrow keys.
- Press Enter to open the secure erase utility.
- Follow the on-screen prompts to confirm the erasure and formatting of your M2 SSD.
- Once the process is complete, exit the BIOS and reboot your computer.
By formatting your M2 SSD from the BIOS, you can ensure that all the data on the drive is securely erased, giving you a fresh start. Remember to back up any important files before proceeding with the formatting process. Now that you know how to format your M2 SSD from the BIOS, you can easily manage and optimize your storage devices.
Formatting A Solid State Drive (ssd)
To format an M2 SSD, you can use the Disk Management utility. Right-click the Start Button, access Disk Management, and find the unallocated space of your drive. Right-click and choose “New Simple Volume” to follow the formatting prompts and select your drive labels and settings.
Alternatively, you can also format the SSD from the BIOS under the “secure erase” option.
Overview Of Ssd Formatting Process
When it comes to solid state drives (SSDs), formatting is a crucial step to ensure proper functionality and performance. Whether you are setting up a new PC build or need to format an existing SSD, it is essential to follow the correct procedures. In this blog post, we will guide you through the process of formatting an SSD, providing you with step-by-step instructions to ensure a smooth and hassle-free experience.Follow Crucial.com’s Guide For Formatting An Ssd
One reliable resource for SSD formatting is Crucial.com. They have an easy-to-follow guide that provides detailed instructions on how to format your SSD properly. By following their guide, you can ensure that you are adhering to the recommended steps and settings, giving you peace of mind that your SSD will function optimally.Ensure Proper Functionality And Performance
Properly formatting an SSD is not only about setting it up correctly initially but also about ensuring ongoing functionality and performance. Once you have formatted your SSD, it is essential to regularly monitor its health and maintain it properly. This includes keeping your firmware up to date, running regular disk checks, and optimizing your operating system settings for SSD usage. By following the proper formatting process, you can maximize the lifespan and performance of your SSD, ultimately enhancing your overall computing experience. Take a look at the following table for a quick summary of the SSD formatting process: | Steps | Description | |——————————————|—————————————————————————————————————————————————————————————————————————————————————————————————————————————————————-| | 1. Access Disk Management utility | If you are not setting up a new PC build, you will need to format your SSD in the Disk Management utility. To access this, right-click the Windows Start Button and select Disk Management from the menu. | | 2. Allocate drive space | In Disk Management, you will see your SSD as unallocated space. Right-click on it and choose “New Simple Volume.” Follow the formatting prompts to allocate drive labels and settings according to your preferences. | | 3. Initialize the disk (if necessary) | In some cases, if the disk is not appearing or listed as offline, you may need to initialize it. To do this, select and hold (or right-click) the disk, then choose “Initialize Disk.” If the disk is listed as offline, select and hold (or right-click) the disk and choose “Online.” | | 4. Follow Crucial.com’s formatting guide | To ensure you are following the correct procedures, refer to Crucial.com’s guide on how to format your SSD. Their step-by-step instructions will guide you through the process and ensure you have optimal settings. | | 5. Regular maintenance and optimization | After formatting your SSD, it is essential to regularly maintain and optimize it for proper functionality and performance. This includes updating your firmware, running disk checks, and optimizing your operating system settings for SSD usage. | Remember to consult your SSD manufacturer’s documentation and guidelines for any specific formatting instructions or recommendations they may have. This will help you ensure that you are formatting your SSD correctly and in line with the manufacturer’s recommendations. Now that you have a comprehensive understanding of the SSD formatting process, you can confidently format your SSD and enjoy improved performance and reliability.Initializing A Disk In Disk Management
If you have a new SSD or need to format an existing one, using the Disk Management utility is the way to go. This powerful tool allows you to manage your disk partitions, including initializing a disk. To get started, follow these simple steps:
Open Disk Management Utility
To access the Disk Management utility, simply right-click the Windows Start Button. A menu will pop up, and you can select “Disk Management” from the list. This will open the Disk Management window, which displays all the connected drives and their current status.
Select The Disk To Initialize
In the Disk Management window, you will see a list of all the connected disks, including your new SSD. Locate the disk you want to initialize and select it. You can do this by either holding down the left mouse button and dragging over the disk, or by right-clicking on the disk and selecting it from the menu.
If The Disk Is Listed As Offline, Bring It Online Before Initialization
Sometimes, the disk you want to initialize may be listed as “Offline”. This means that the disk is not currently accessible by the system. To bring it online, simply select the disk, right-click on it, and choose the “Online” option from the menu. This will make the disk accessible and ready for initialization.
Once you have selected the disk and brought it online (if necessary), you are ready to proceed with the initialization process. Right-click on the disk again, and this time select “Initialize Disk” from the menu. This will prompt a new window where you can choose the type of initialization you want to perform.
Initializing a disk in Disk Management is a crucial step in formatting your M2 SSD. By following these simple steps, you can ensure that your SSD is properly initialized and ready for use. Whether you are setting up a new SSD or reformatting an existing one, using the Disk Management utility is a convenient and efficient way to get the job done.
Special Considerations For Ssd Formatting
Formatting an M.2 SSD or any other solid-state drive (SSD) requires special considerations to ensure optimal performance and longevity. Unlike traditional hard disk drives (HDDs), SSDs use flash memory technology, which requires different formatting techniques. In this section, we will explore the specific steps and recommendations for formatting an M.2 SSD.
Ssd Format Tool Recommendations
When it comes to formatting an M.2 SSD, using a reliable SSD format tool is essential. These tools provide a user-friendly interface and advanced formatting options tailored specifically for SSDs. Here are some recommended SSD format tools:
- Crucial Storage Executive: A comprehensive tool that allows you to monitor and manage your Crucial SSD, including formatting options.
- Samsung Magician: Designed for Samsung SSDs, this powerful software provides various optimization features, including SSD formatting.
- Intel Solid State Toolbox: Offering a wide range of SSD management functions, this tool also enables easy formatting for Intel SSDs.
Using a trusted SSD format tool ensures that you have access to the necessary features and settings to properly format your M.2 SSD.
How To Format An Ssd With The Operating System Installed On It
If you have the operating system (OS) installed on your M.2 SSD, formatting it requires a different approach. Follow these specific steps to format an SSD with the OS already installed:
- Step 1: Back Up Your Data: Before proceeding with the formatting process, it’s crucial to back up all your important data. This ensures that you don’t lose any valuable information during the formatting process.
- Step 2: Create a Bootable USB Drive: To format an SSD with the OS installed, you need to create a bootable USB drive with the operating system installation files. This will allow you to reinstall the OS after formatting the SSD.
- Step 3: Boot from USB Drive: Restart your computer and enter the BIOS settings. Set the USB drive as the primary boot device to start the OS reinstallation process.
- Step 4: Format the SSD: During the OS reinstallation process, you will reach a stage where you can choose the SSD as the installation location. At this point, you can format the SSD by selecting the “Format” option.
- Step 5: Complete the OS Reinstallation: Follow the on-screen instructions to complete the OS reinstallation. Make sure to select the correct settings and preferences according to your needs.
By following these steps, you can successfully format an M.2 SSD with the operating system already installed.
Specific Steps For Formatting An Nvme Ssd
Formatting an NVMe SSD (Non-Volatile Memory Express) follows a similar process to other SSDs, with a few specific steps. Here’s how to format an NVMe SSD:
- Step 1: Check Compatibility: Ensure that your computer and motherboard support NVMe SSDs before proceeding with the formatting process.
- Step 2: Access Disk Management Utility: In Windows, right-click the Start Button and select “Disk Management” to access the Disk Management utility.
- Step 3: Find the NVMe SSD: In Disk Management, locate your NVMe SSD. It will appear as unallocated space or with no drive letter assigned.
- Step 4: Initialize the SSD: Select the NVMe SSD and initialize it by right-clicking it and selecting “Initialize Disk.” If it is listed as “Offline,” right-click it and select “Online.”
- Step 5: Create New Simple Volume: Right-click the unallocated space of the NVMe SSD, select “New Simple Volume,” and follow the formatting prompts. Set your desired drive labels and settings during the process.
Following these specific steps ensures the correct formatting of an NVMe SSD, allowing you to maximize its performance and reliability.
Frequently Asked Questions Of How To Format M2 Ssd
What Is The Best Format For M2 Ssd?
The best format for an m2 SSD is the NTFS format. To format the drive, access the Disk Management utility by right-clicking the Windows Start Button and selecting it. The drive will appear as unallocated space, right-click and choose “New Simple Volume”.
Follow the formatting prompts, choose your drive labels and settings, and you’re good to go.
How Do I Format An M 2 Ssd In Windows 11?
To format an M. 2 SSD in Windows 11, follow these steps: 1. Right click the Windows Start Button and open Disk Management utility. 2. Locate the unallocated space of the M. 2 SSD and right click on it. 3. Choose “New Simple Volume” and follow the formatting prompts.
4. Select your drive labels and settings. 5. Alternatively, you can also format the SSD from the BIOS under the “secure erase” tab. For more information, you can search on Google or visit websites like Crucial. com or Microsoft Learn.
How Do I Wipe My M2 Ssd?
To wipe your m2 SSD, follow these steps: 1. Go to Disk Management utility by right-clicking the Windows Start Button. 2. Find the unallocated space of your SSD and right-click it. 3. Choose “New Simple Volume” and follow the formatting prompts.
4. Customize drive labels and settings as needed. 5. Alternatively, you may access the “secure erase” option in the BIOS under a designated tab. 6. If your SSD is not appearing in Windows, try initializing it in Disk Management by selecting the disk and choosing “Initialize Disk.
” 7. Seek additional help from Seagate or Crucial for formatting SSDs. 8. Remember to back up your important data before proceeding.
How Do I Initialize An M 2 Ssd?
To initialize an M. 2 SSD, follow these steps: 1. Right-click the Windows Start Button and select Disk Management. 2. If the drive appears as unallocated space, right-click it and choose “New Simple Volume”. 3. Follow the formatting prompts and select your drive labels and settings.
4. In the Disk Management utility, select the disk you want to initialize, right-click it, and choose “Initialize Disk”. 5. If the disk is listed as Offline, select it, right-click it, and select “Online”. 6. Make sure to format your SSD with the operating system on it.
7. If needed, you can use an SSD format tool to format NVMe SSDs. For more assistance, consult the manufacturer’s guidelines or search online.
Conclusion
To format an M2 SSD, follow these steps. If you are not building a new PC, access the Disk Management utility by right-clicking the Windows Start Button. Find your unallocated drive and select “New Simple Volume”. Answer the formatting prompts and customize your drive labels and settings.
Additionally, some BIOS may have a “secure erase” option under a tab, allowing you to format the M2 SSD. Formatting an SSD is crucial for optimal performance and organization. These steps will ensure your M2 SSD is formatted correctly and ready to use.


Leave a Reply