To replace GPU thermal paste, use a cotton cloth or coffee filter dipped in rubbing alcohol or nail polish remover to gently wipe away the old paste from the processor. Be careful to not leave any fibers behind.
Replace the old thermal paste with a new layer by applying a small amount directly onto the GPU. Spread it evenly using a plastic spreader or a clean finger. Ensure that the paste covers the entire surface of the GPU.
Gathering The Necessary Tools And Preparing:
Ensure that you have all the necessary tools and materials before replacing the GPU thermal paste. Follow step-by-step guides available on websites and YouTube channels to carefully clean and replace the thermal paste for optimal performance of your GPU.
of thumb is to replace thermal pads whenever you are replacing the thermal paste on your GPU. Thermal pads are designed to provide a cushion and fill any gaps between the heat sink and the GPU, ensuring optimal heat transfer. Over time, these thermal pads can become less effective due to wear and tear, causing poor heat dissipation. Therefore, it is recommended to replace thermal pads along with the thermal paste to ensure maximum cooling efficiency. Now, let’s get into the details of gathering the necessary tools and preparing for the process of replacing GPU thermal paste.List Of Tools Required For Replacing Gpu Thermal Paste
Before you begin replacing the thermal paste on your GPU, make sure you have the following tools handy: 1. Screwdriver – to unscrew the GPU from the motherboard. 2. Thermal paste remover – to clean off the old thermal paste. 3. Cleaning wipes or cotton swabs – to apply the thermal paste remover and clean the GPU surface. 4. Isopropyl alcohol – to ensure a thorough cleaning of the GPU surface. 5. New thermal paste – to apply a fresh layer for improved heat transfer. 6. Thermal pads (optional) – if you choose to replace them along with the thermal paste. 7. Anti-static wrist strap (optional) – to prevent electrostatic discharge and protect your GPU from damage during the process.Precautions To Take Before Starting The Process
Taking certain precautions before starting the process of replacing GPU thermal paste can help ensure a smooth and successful operation. Here are some important precautions to keep in mind: 1. Turn off your computer and disconnect it from the power source to prevent any electrical accidents. 2. Work in a clean and well-ventilated area to avoid dust and ensure proper airflow. 3. Ground yourself by using an anti-static wrist strap or by touching a grounded object to prevent static electricity from damaging your GPU. 4. Follow the manufacturer’s instructions for your specific GPU model, as some models may have unique considerations or restrictions. 5. Take clear and detailed photos of your GPU’s components and connections before you start, to help with reassembly later. 6. Use caution when handling the GPU, being mindful of delicate components and connectors. 7. Double-check that you have all the necessary tools and materials before starting the process to avoid interruptions. By gathering the necessary tools and taking these precautions, you’ll be well-prepared to replace the thermal paste on your GPU and ensure optimal heat dissipation. Next, we’ll move on to the step-by-step process of replacing GPU thermal paste.
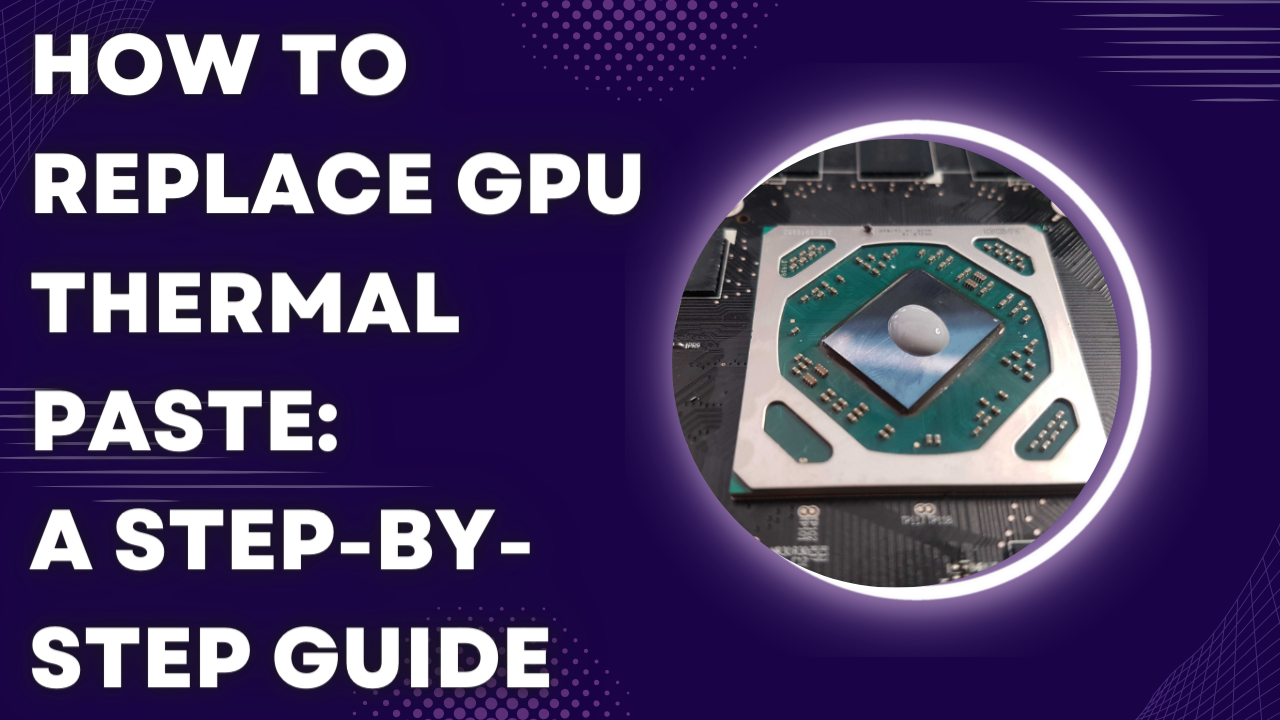
Credit: tehnoblog.org
Removing The Gpu:
To replace GPU thermal paste, first, carefully remove the GPU from your system. Use caution and follow the proper steps to avoid damaging any components. Once the GPU is removed, clean off the old thermal paste and apply a fresh layer before reattaching the GPU.
This will help improve heat dissipation and maintain optimal performance.
Step-by-step Guide To Safely Remove The Gpu From The Motherboard
Removing the GPU from the motherboard is a crucial step in replacing the thermal paste. If done incorrectly, it can result in damage to both the GPU and the motherboard. To ensure a smooth and safe removal process, follow this step-by-step guide:
- Turn off your computer and unplug it from the power source.
- Open the computer case, ensuring you are working in a clean and static-free environment.
- Locate the GPU, which is usually inserted into a PCI-E slot on the motherboard.
- Gently grasp the GPU by its sides, avoiding touching any sensitive components or connectors.
- Press down on the release latch located at the end of the PCI-E slot to unlock the GPU.
- Slowly and carefully pull the GPU straight out of the slot, ensuring that it comes out smoothly without any resistance.
- Place the GPU on an anti-static surface or wrap it in an anti-static bag to prevent damage.
Factors To Consider While Handling The Gpu During Removal
Handling the GPU during the removal process requires careful attention to prevent any damage. Here are some important factors to consider:
- Static electricity: Make sure to ground yourself by wearing an anti-static wristband or regularly touching a grounded metal object to avoid damaging sensitive components.
- Proper grip: Always hold the GPU by its sides, avoiding touching any connectors or sensitive parts.
- Unplugging connectors: Before removing the GPU, ensure that all the power connectors and other cables connected to it are properly disconnected.
- Smooth removal: Gently pull the GPU straight out of the slot to avoid any bending or damaging of the connectors.
- Avoid excessive force: Do not use excessive force or twisting motions while removing the GPU, as it can cause damage to the motherboard or GPU itself.
By following these factors, you can ensure a safe and damage-free removal of the GPU from the motherboard.
Detaching The Cooling System And Baseplate:
To replace GPU thermal paste, start by detaching the cooling system and baseplate. This allows you to access the GPU and clean off the old thermal paste before applying a fresh layer for optimal heat dissipation.
Detaching the Cooling System and Baseplate: To successfully replace the GPU thermal paste, it is essential to detach the cooling system and baseplate. This step is crucial as it allows easy access to the GPU, ensuring a thorough and effective replacement of the thermal paste. H3: Importance of Removing the Cooling System for Easy Access to the GPU One of the most important reasons for removing the cooling system is to ensure easy access to the GPU. The cooling system is responsible for keeping the GPU cool during intensive tasks like gaming or rendering. Over time, the thermal paste between the GPU and the cooling system may deteriorate, leading to poor heat transfer and increased temperatures. By detaching the cooling system, you can directly access the GPU and replace the old thermal paste with a fresh layer, ultimately improving heat dissipation and preventing potential overheating issues. H3: Detailed Instructions on Removing the Baseplate Here are the detailed instructions on removing the baseplate: 1. Start by powering off your computer and disconnecting all cables from the GPU. Ensure the computer is completely shut down before proceeding with the removal process. 2. Open the computer case, exposing the internal components. Take necessary safety precautions, such as wearing an anti-static wrist strap, to prevent any damage caused by static electricity. 3. Locate the baseplate of the GPU. It is usually secured by several screws. Use a screwdriver appropriate for the screw type and carefully unscrew each screw, keeping them organized for reassembly. 4. Once all the screws are removed, gently lift the baseplate from the GPU. Be mindful of any connected cables or wires that may be attached to the baseplate. Carefully detach and set them aside. 5. With the baseplate removed, the GPU will now be easily accessible. Take this opportunity to inspect the GPU for any dust or debris accumulation. If necessary, use compressed air or a soft brush to clean the GPU surface. 6. Proceed with cleaning the old thermal paste from the GPU using a high-quality thermal paste remover or isopropyl alcohol. Apply a small amount of the remover on a lint-free cloth or cotton swab, and gently wipe away the old thermal paste until the GPU is clean and free from residue. 7. Once the GPU is clean, it’s time to apply the new thermal paste. Follow the manufacturer’s instructions for applying the thermal paste. Generally, a small pea-sized amount at the center of the GPU is sufficient. 8. After applying the thermal paste, reattach the cooling system and baseplate. Ensure all cables and wires are properly connected. Align the screw holes and carefully tighten each screw to secure the baseplate back in place. 9. Finally, close the computer case, reconnect all the cables, and power on the computer. Monitor the GPU temperatures to ensure that the new thermal paste is effectively dissipating heat. By properly detaching the cooling system and baseplate, you can easily access the GPU, clean the old thermal paste, and apply a new layer, thereby improving the cooling efficiency and ensuring optimal performance for your GPU.Removing The Old Thermal Paste:
To replace GPU thermal paste, start by removing the old thermal paste using a cleaning solution and a lint-free cloth. Gently clean the GPU and heatsink before applying a new layer of thermal paste for optimal cooling performance.
The Importance Of Cleaning Old Thermal Paste For Efficient Heat Transfer
Cleaning the old thermal paste is a crucial step in replacing your GPU’s thermal paste. Over time, thermal paste can degrade, dry out, and become less effective at conducting heat. This can lead to increased temperatures and reduced performance of your GPU. By properly removing the old thermal paste, you can ensure optimal heat transfer between the GPU and the heatsink, improving cooling efficiency and overall system stability.
Recommended Methods And Tools To Remove The Old Thermal Paste
When it comes to removing the old thermal paste, there are several recommended methods and tools you can use:
- Isopropyl alcohol: Isopropyl alcohol is a commonly used cleaning agent that effectively removes residual thermal paste. It evaporates quickly, leaving no residue behind. You can use it with cotton swabs or lint-free cloths for precise cleaning.
- Coffee filters: Coffee filters are an excellent alternative to cotton swabs or cloths as they are lint-free and can absorb excess thermal paste without leaving fibers behind.
- Plastic scraper or credit card: A plastic scraper or an old credit card can be used to gently scrape off the old thermal paste from the surface of the GPU and the heatsink. Be careful not to apply excessive force to avoid damaging the components.
Here’s a step-by-step guide to removing the old thermal paste:
- Step 1: Begin by disconnecting the power supply and removing the GPU from your system. It’s important to work in a well-ventilated area and use an anti-static wrist strap to prevent any damage to sensitive components.
- Step 2: Using a plastic scraper or credit card, gently scrape off the old thermal paste from the GPU and the heatsink. Be thorough but gentle to avoid any damage to the surfaces.
- Step 3: Once the majority of the thermal paste has been removed, use cotton swabs or lint-free cloths soaked in isopropyl alcohol to clean the remaining residue. Make sure to clean both the GPU and the heatsink thoroughly.
- Step 4: For hard-to-reach areas, you can use a small brush, such as a toothbrush, to scrub away any stubborn thermal paste residue. Be cautious not to use excessive force.
- Step 5: After cleaning, allow the GPU and heatsink to dry completely before applying fresh thermal paste.
By following these recommended methods and tools, you can effectively remove the old thermal paste, ensuring a clean surface for proper application of the new thermal paste. This will result in improved heat transfer and overall GPU performance.
Applying New Thermal Paste:
To replace GPU thermal paste, begin by removing the GPU and baseplate. Then, carefully remove the old thermal paste and clean the surface before applying a new layer. Finally, reattach the cooler and test the results. Regularly replacing thermal paste helps maintain optimal performance.
Choosing The Right Thermal Paste For Your Gpu
When it comes to replacing the thermal paste on your GPU, it is crucial to choose the right product for optimal heat conductivity. There are various options available in the market, but not all thermal pastes are created equal. Here are a few factors to consider when selecting the thermal paste for your GPU:- Thermal Conductivity: Look for a thermal paste that offers high thermal conductivity, as this will ensure efficient heat transfer from the GPU to the heatsink.
- Consistency: Consider the consistency of the thermal paste. It should be easy to apply and spread evenly on the GPU surface.
- Durability: Opt for a thermal paste that is long-lasting and does not dry out or degrade over time.
- Compatibility: Ensure that the thermal paste you choose is specifically designed for use with GPUs to maximize its effectiveness.
Step-by-step Instructions For Applying New Thermal Paste Properly:
- Start by preparing the necessary tools and materials. You will need a cleaning solution, lint-free cloth or cotton swabs, isopropyl alcohol, thermal paste, and a screwdriver to remove the GPU from the computer.
- Turn off your computer and unplug it from the power source to ensure safety.
- Remove the GPU from the computer. This may involve unscrewing it from the motherboard or removing any cables connected to it, depending on your computer’s setup.
- Once the GPU is detached, carefully clean the old thermal paste from the GPU and heatsink using a lint-free cloth or cotton swabs dampened with isopropyl alcohol. Ensure that all residue is removed.
- Apply a small amount of new thermal paste to the center of the GPU. The size of a rice grain is usually sufficient. Note: Refer to the manufacturer’s instructions for specific guidance on the amount of thermal paste to be used.
- Using a spreading tool or a clean finger wrapped in a plastic glove, gently spread the thermal paste evenly across the GPU surface. Ensure that the paste covers the entire surface but is not applied too thickly.
- Reassemble the GPU by securing it back into place, following the reverse process of the removal steps.
- Plug in any cables that were disconnected and ensure a secure connection.
- Power on your computer and monitor the GPU temperatures to verify that the new thermal paste is improving heat dissipation. You can use software utilities or hardware monitoring tools for this purpose.
By following these step-by-step instructions and choosing the right thermal paste for your GPU, you can ensure optimum performance and temperature regulation. Remember to periodically check and replace the thermal paste to keep your GPU running smoothly and prevent issues related to overheating. Now that you have successfully applied new thermal paste to your GPU, enjoy a cooler and more efficient gaming experience!
Reassembling The Gpu:
Reassembling the GPU after replacing the thermal paste is a crucial step in maintaining optimal performance. Follow the step-by-step guide to ensure a smooth process, including removing the GPU, cleaning the old thermal paste, and attaching the cooler. Don’t forget to test the thermal paste application for the best results.
Properly Reconnecting The Gpu To The Motherboard
Now that you have successfully applied the new thermal paste to your GPU, it’s time to reassemble your graphics card and ensure that it is properly connected to the motherboard. This step is crucial in order to ensure optimal performance and prevent any potential issues.
First, carefully place the GPU back into its slot on the motherboard. Make sure it is aligned correctly, and gently press it down until it is fully inserted. You may need to apply a bit of pressure, but be careful not to use excessive force as this could damage the GPU or the motherboard.
Next, it’s important to ensure that all connectors are securely plugged in. Check all the cables and connectors that were disconnected during the disassembly process. Make sure they are properly aligned and fully inserted into their respective ports.
Take a close look at each connector and ensure there are no bent pins or any other signs of damage. If you notice any issues, carefully straighten the pins using a small needle or tweezers before reconnecting the cable.
Once all the connectors are securely plugged in, double-check each connection to make sure it is snug and tightly fastened. Gently wiggle the cables to ensure they are properly seated and there is no loose connection.
After reassembling the GPU and ensuring all connectors are securely plugged in, replace the baseplate and screw it back into place using the appropriate screws. Make sure the baseplate is aligned correctly and evenly tightened to avoid any unnecessary pressure on the GPU.
Once everything is reassembled, it’s a good idea to perform a quick visual inspection to make sure nothing was missed and everything looks as it should. Finally, plug in the necessary power cables and turn on your computer to test the GPU’s functionality.
Congratulations! You have successfully reassembled your GPU after replacing the thermal paste. By following these steps and ensuring proper connections, you can expect improved thermal performance and optimize the longevity of your graphics card.
Testing And Conclusion:
Performing thermal paste test to check for improvements in temperature
One of the crucial steps in replacing GPU thermal paste is testing the effectiveness of the newly applied paste. By conducting temperature tests before and after replacing the thermal paste, you can determine whether the replacement has resulted in any improvements in cooling efficiency.
The thermal paste test involves monitoring the GPU’s temperature while running intensive tasks such as gaming or running benchmarking software. Before replacing the thermal paste, record the initial temperature readings. After applying the new thermal paste, run the same tasks and observe any changes in temperature.
Here are the steps to perform the thermal paste test:
- Ensure that your GPU is properly installed and all connections are secure.
- Run a stress test or any demanding task that puts a significant load on your GPU.
- Monitor the temperature using software such as GPU-Z or MSI Afterburner.
- Record the temperature readings at regular intervals during the test.
- Compare the temperature readings before and after replacing the thermal paste.
The purpose of this test is to determine whether the new thermal paste has effectively reduced the GPU’s temperature under load. Lower temperatures indicate better heat dissipation and improved cooling performance.
Importance Of Regular Maintenance And Replacement Of Thermal Paste
Regular maintenance and replacement of thermal paste is crucial for maintaining optimal performance and prolonging the lifespan of your GPU. Over time, the thermal paste can degrade, dry out, or become less effective, leading to increased temperatures and potential overheating issues.
Here are the reasons why regular maintenance and replacement of thermal paste are important:
- Improved heat transfer: Thermal paste fills in microscopic gaps between the GPU die and the cooler, ensuring optimal heat transfer. Over time, the thermal paste may dry out or lose its effectiveness, compromising heat dissipation.
- Prevention of overheating: A well-applied, high-quality thermal paste helps prevent the GPU from overheating, which can result in performance throttling or even permanent damage to the graphics card.
- Enhanced stability: Lower temperatures achieved through proper thermal paste application can contribute to a more stable system, reducing the likelihood of crashes or thermal shutdowns during demanding tasks.
- Extended GPU lifespan: By maintaining lower temperatures, regular maintenance and replacement of thermal paste can help prolong the lifespan of your GPU, saving you from expensive upgrades or replacements.
Therefore, it is recommended to perform regular checks on your GPU’s thermal paste and replace it as necessary. This will ensure that your GPU performs optimally and remains cool even during intensive tasks.
Frequently Asked Questions For How To Replace Gpu Thermal Paste
Do I Need To Replace Thermal Paste On Gpu?
You should replace the thermal paste on your GPU every 2-3 years or if the graphics card overheats. It is not recommended to run your GPU without thermal paste as it will cause overheating. You can remove the thermal paste with a cotton cloth or coffee filter dipped in rubbing alcohol or nail polish remover.
Can I Run My Gpu Without Thermal Paste?
No, it is not okay to run your GPU without thermal paste. Thermal paste helps dissipate heat effectively. Without it, your computer will overheat quickly.
Can You Replace Thermal Pads On Gpu?
Yes, you can replace thermal pads on a GPU. It is recommended to replace them when you notice more than usual heat. To remove thermal paste from the GPU, use a cotton cloth or coffee filter with rubbing alcohol or nail polish remover.
Gently wipe away the old paste, being careful not to leave any fibers behind.
How Do I Remove Thermal Paste From My Gpu?
To remove thermal paste from your GPU, use a cotton cloth or coffee filter soaked in rubbing alcohol or nail polish remover. Gently wipe the paste away from the processor and be careful not to leave any fibers behind.
Conclusion
When it comes to giving your GPU the best possible performance, replacing the thermal paste is crucial. By following the steps mentioned you can ensure that your GPU stays cool and functions optimally. Remember to use a cotton cloth or coffee filter dipped in rubbing alcohol or nail polish remover to gently wipe away the old thermal paste.
With a little bit of effort, you can keep your GPU running smoothly for years to come. So, go ahead and give your GPU the care it deserves!


Leave a Reply