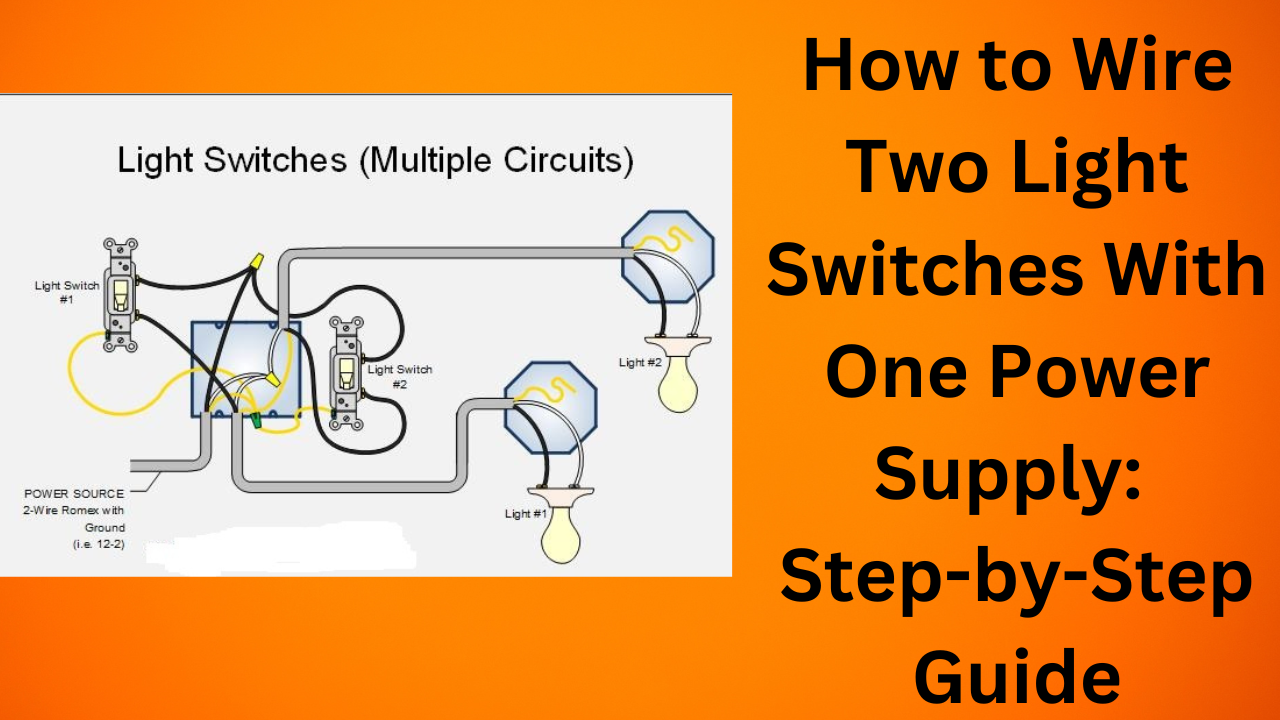
To wire two light switches with one power supply, you can connect the switches in parallel. This means connecting the line wire (usually black) to the terminal screws of both switches, and then connecting the load wire (usually red) to the other terminal screw on each switch.
This setup allows you to control multiple lights from each switch. Light Switches are commonly used in households and other places to control the lighting in a room. In some cases, you may need to wire two light switches with a single power supply, either to control multiple lights or enable two switches to control a single light.
This article will guide you on how to wire two light switches with one power supply effectively. By following these steps, you can easily connect the switches in parallel and have control over the lighting from each switch.
1. Gather The Necessary Tools And Materials
To wire two light switches with one power supply, start by gathering the necessary tools and materials such as switches, wires, and a voltage detector. Ensure you have everything you need for a smooth installation process.
Before you begin wiring two light switches with one power supply, make sure to gather all the necessary tools and materials. Having everything organized and easily accessible will make the process much smoother and more efficient.
Tools:
- Wire cutter/stripper
- Screwdriver
- Voltage detector
- Electrical tape
Materials:
- Wire nuts
- Two gang junction box
- Two single pole switches
- Electrical wire
Having the right tools and materials at hand will ensure that you can complete the wiring process without any issues. Let’s go through each tool and material to understand their importance in this project.
Wire Cutter/stripper:
A wire cutter/stripper is essential for cutting and stripping the electrical wire. This tool allows you to remove the outer insulation of the wire and expose the bare copper wire underneath. It’s important to have a clean and properly stripped wire for a secure connection.
Screwdriver:
A screwdriver is needed to secure the switches and wire nuts in place. Make sure to choose the appropriate type and size of screwdriver for the screws used in your switches and junction box.
Voltage Detector:
A voltage detector is an essential safety tool. It helps you determine if there is any live electrical current in a wire or circuit. Always use a voltage detector before touching any wires to ensure your safety.
Electrical Tape:
Electrical tape is used to insulate and protect wire connections. It helps prevent any accidental contact with exposed wires and ensures a secure and reliable connection.
Wire Nuts:
Wire nuts are used to connect and secure wires together. They provide a safe and insulated connection between multiple wires, ensuring proper electrical conductivity.
Two Gang Junction Box:
A two gang junction box is used to house the switches and provide a neat and secure installation. It provides the necessary space for connecting and organizing the wires.
Two Single Pole Switches:
Single pole switches are the most common type of switches used in residential wiring. They allow you to control the flow of electricity to individual lights or fixtures.
Electrical Wire:
Electrical wire is used to connect the switches with the power supply and lights. Make sure to choose the appropriate gauge and type of wire for your specific project.
Now that you have gathered all the necessary tools and materials, you are ready to start wiring two light switches with one power supply. Proceed to the next step to learn the process in detail.

Credit: www.directenergy.com
2. Turn Off The Power Supply
To wire two light switches with one power supply, start by turning off the power supply to ensure safety. This step is crucial before starting any electrical work.
Before proceeding with any electrical work, it is crucial to ensure your safety by turning off the power supply. This step is essential to prevent any electrical shocks or accidents while working on the light switches. To turn off the power supply, follow the steps below:
Locate The Circuit Breaker That Controls The Power Supply To The Switches
- First, locate the circuit breaker panel in your home. It is usually located in the basement, garage, or utility room.
- Open the circuit breaker panel cover using a screwdriver or by flipping the latches, depending on the type of panel.
- Inside the panel, you will see a series of switches or breakers that control the electrical circuits in your home.
- Identify the circuit breaker that supplies power to the light switches you are working on.
Flip The Corresponding Circuit Breaker To The “off” Position
- Once you have located the circuit breaker responsible for the light switches, use your hand or a screwdriver to flip the switch to the “off” position.
- Make sure that the switch is securely in the “off” position to cut off the power supply effectively.
- To confirm if the power supply is turned off, try turning on the lights controlled by the switches. If they don’t turn on, it means the power supply is successfully turned off.
Remember, safety should always be your top priority when working with electrical components. Turning off the power supply is crucial to avoid any accidental injuries or damages. It is recommended to use a voltage detector to double-check if the power is off before proceeding with any wiring work.
3. Install The Two Gang Junction Box
To wire two light switches with one power supply, start by installing a two-gang junction box. This will provide the space needed for both switches. Ensure you follow the appropriate wiring guidelines and use caution when working with electrical connections.
Now that you have planned the wiring layout and gathered all the necessary materials and tools, it’s time to install the two gang junction box. This box will serve as the central hub for connecting the power supply and the light switches.
Choose A Suitable Location For The Junction Box
Before you begin the installation process, carefully choose a suitable location for the junction box. It should be easily accessible and located within a reasonable distance from the light switches and the power supply. Ideally, the box should be mounted on an interior wall, away from any moisture or excessive heat sources.
Mark The Location And Cut A Hole In The Wall
Once you have identified the perfect location for the junction box, mark it using a pencil or a marker. Use a level to ensure that the markings are straight and aligned. After marking the location, it’s time to cut a hole in the wall. Use a utility knife or a drywall saw to carefully cut along the marked lines. Be cautious and precise to avoid damaging any electrical or plumbing components behind the wall.
Attach The Junction Box To The Wall Using Screws Or Nails
After cutting the hole, take the two gang junction box and align it with the hole in the wall. Make sure the box is level and centered. Securely attach the junction box to the wall using screws or nails. Ensure that the box is tightly fastened to provide stability and support for the electrical connections.
4. Connect The Power Supply To The First Switch
To wire two light switches with one power supply, start by connecting the power supply to the first switch. This will allow you to control multiple lights from a single source of power.
To successfully wire two light switches with one power supply, you need to connect the power supply to the first switch. Follow these steps to ensure a secure and efficient connection.Strip The Ends Of The Electrical Wire
Firstly, strip the ends of the electrical wire that you will be using for the connection. This will expose the bare copper wire needed for a proper electrical connection. Use wire strippers to carefully remove the outer insulation, ensuring that you do not damage the wires inside.Connect The Black Wire From The Power Supply To The Black Screw Terminal On The First Switch
Next, take the black wire from the power supply and connect it to the black screw terminal on the first switch. This black wire is referred to as the “hot” wire and carries the electrical current. Secure the connection by tightening the screw terminal with a screwdriver until it is firmly in place.Connect The White Wire From The Power Supply To The White Wire In The Electrical Box Using A Wire Nut
After connecting the black wire, you need to connect the white wire from the power supply to the white wire in the electrical box. To do this, twist the two wires together and cover them with a wire nut. Make sure that the connection is tight and secure, as this prevents any electrical accidents or malfunction.Connect The Bare Copper Wire From The Power Supply To The Green Grounding Screw On The Switch
Finally, connect the bare copper wire from the power supply to the green grounding screw on the switch. This wire is responsible for grounding the electrical system, providing safety and preventing shocks or electrical hazards. Use a screwdriver to fasten the bare copper wire onto the green grounding screw, ensuring that it is tightly secured. By following these steps, you will successfully connect the power supply to the first switch, setting the foundation for wiring two light switches with one power supply. Remember to double-check all connections and ensure that they are secure before proceeding to the next step of the wiring process.5. Connect The First Switch To The Second Switch
Connect the first switch to the second switch to wire two light switches with one power supply. This allows you to control multiple lights or a single light with two three-way switches.
In this section, we will discuss how to connect the first switch to the second switch when wiring two light switches with one power supply. By following these steps, you will be able to control multiple lights from a single power source. 1. Strip the ends of the electrical wire: To start this process, you will need to strip the ends of the electrical wire. Strip about half an inch of insulation from each end using wire strippers. Make sure to do this carefully to avoid damaging the wires. 2. Connect the black wire from the first switch to the black wire on the second switch using a wire nut: Next, take the black wire from the first switch and connect it to the black wire on the second switch using a wire nut. Twist the ends of the wires together and screw on the wire nut securely. This will create a solid connection between the two switches. 3. Connect the white wire from the first switch to the white wire on the second switch using a wire nut: Similarly, take the white wire from the first switch and connect it to the white wire on the second switch using a wire nut. Twist the ends of the wires together and secure the wire nut tightly. This will ensure a proper connection between the two switches. 4. Connect the bare copper wire from the first switch to the bare copper wire on the second switch using a wire nut: Lastly, take the bare copper wire from the first switch and connect it to the bare copper wire on the second switch using a wire nut. Twist the ends of the wires together and tighten the wire nut firmly. This will establish a secure connection for the grounding wires. By following these steps, you will successfully connect the first switch to the second switch when wiring two light switches with one power supply. Make sure to double-check all the connections before turning on the power.6. Connect The Second Switch To The Lights
To wire two light switches with one power supply, connect the second switch to the lights by running wiring to all the lights in series. Use the hot (black) wire to wire the switch leg. This allows you to control multiple lights with multiple switches from a single power source.
To complete the wiring process, you will need to connect the second switch to the lights. This step ensures that both switches have control over the same set of lights. Here’s how you can do it:Strip The Ends Of The Electrical Wire
Start by stripping the ends of the electrical wire that will connect the second switch to the lights. Using wire strippers, carefully remove about 1/2 inch of insulation from the ends of the wires. Make sure to strip both the black and white wires.Connect The Black Wire From The Second Switch To The Black Wire Of The First Light Fixture Using A Wire Nut
Using a wire nut, connect the black wire from the second switch to the black wire of the first light fixture. Twist the wires together clockwise and secure them by twisting the wire nut over the connection. Make sure the connection is tight and secure.Connect The White Wire From The Second Switch To The White Wire Of The First Light Fixture Using A Wire Nut
Similarly, connect the white wire from the second switch to the white wire of the first light fixture using another wire nut. Twist the wires together clockwise and secure them with the wire nut. Double-check to ensure a tight and secure connection.Repeat The Process To Connect The Remaining Light Fixtures To The Second Switch
Next, repeat the process for all the remaining light fixtures to connect them to the second switch. Connect the black wire from each fixture to the black wire of the second switch using wire nuts, and connect the white wire from each fixture to the white wire of the second switch using wire nuts. Remember to always twist the wires together clockwise before securing them with wire nuts. This ensures a proper and secure connection. By following these steps, you can easily wire two light switches with one power supply, allowing you to control multiple lights from different locations.Frequently Asked Questions On How To Wire Two Light Switches With One Power Supply
Can One Power Source Power 2 Light Switches?
Yes, you can power two light switches from a single power source to control multiple lights. It is also possible to wire two “three-way” switches to control a single light.
How To Wire Two Light Switches On One Circuit?
To wire two light switches on one circuit, you can connect them in parallel to the power source. Use separate wires from each switch to the lights you want to control. Make sure to follow proper wiring guidelines and consult a professional if needed.
How To Run 2 Switches For 1 Light 12v?
To run 2 switches for 1 light (12V), you can wire them in series. Connect the hot wire (black) to the switch leg, and let the neutral wire run through. This way, the line voltage coming into the switch will control the light.
It is important to follow proper electrical wiring procedures for safety.
Does The Hot Wire Go On Top Or Bottom Of A Light Switch?
The hot wire on a light switch can go on either the top or bottom, depending on the type of switch. If it’s an enclosed switch, it doesn’t matter. For a knife switch, the power should come into the switch on the side without the blades.
Conclusion
To sum up, wiring two light switches with one power supply is a convenient way to control multiple lights or a single light with “three-way” switches. By following the correct wiring techniques, such as using the hot wire for the switch leg and allowing the neutral to run through, you can successfully wire two switches and lights using the same power supply.
Remember, always ensure proper safety measures when working with electrical wiring.


Leave a Reply