To connect a WiFi antenna to a motherboard, locate the two threaded studs in golden color on the rear I/O panel of the motherboard and attach the antenna by screwing it onto the studs. Ensure that the antenna is positioned in a location that provides the best signal strength for optimal performance.
If you’re looking to connect a WiFi antenna to your motherboard, it’s essential to understand the correct procedure for seamless and effective connectivity. By following the simple steps outlined below, you’ll be able to connect your WiFi antenna to the motherboard in no time.
Whether you’re replacing a faulty antenna or setting up a new one, ensuring a strong signal strength is crucial for a smooth and uninterrupted internet experience. By positioning the antenna properly and fastening it securely to the designated studs, you can enhance your WiFi signal and enjoy reliable internet connectivity. We will guide you through the process of connecting a WiFi antenna to a motherboard, making it easy for you to get started.
Understanding The Purpose Of Wifi Antennas
To connect a WiFi antenna to the motherboard, locate the WiFi card antenna outlets on the rear of the PC. Attach the antennas by screwing them on until finger tight, and experiment with their angle until the best reception is achieved.
Importance Of Wifi Antennas For Internet Connection
Wifi antennas play a crucial role in establishing a reliable internet connection for your motherboard. They act as transmitters and receivers, allowing your computer to communicate with the wireless router and access the internet. Without a wifi antenna, your motherboard would not be able to connect wirelessly to the internet, limiting your online capabilities.How Wifi Antennas Boost Signal Strength
Wifi antennas are specifically designed to enhance the signal strength of your wireless connection. They work by capturing and amplifying the radio waves emitted by your router, thereby increasing the range and improving the overall quality of your wifi signal. By attaching a wifi antenna to your motherboard, you can enjoy a more stable and faster internet connection, especially when compared to relying solely on the built-in wifi capabilities of your motherboard.Affixing Wifi Antennas To Your Motherboard
To connect a wifi antenna to your motherboard, first, locate the wifi card antenna outlets on the rear of your PC. These outlets are usually indicated by labeled ports. Once you have identified the ports, screw in the wifi antennas until they are finger tight. This ensures a secure connection and prevents them from coming loose while in use.Optimizing Wifi Antenna Placement
While connecting the wifi antennas, it’s essential to pay attention to their placement. Position the antennas in a location that offers the strongest signal reception. Experiment with different angles and rotations to find the optimal position that provides the best wifi signal strength. You can also consider using a wifi antenna stand or mounting brackets to elevate and position the antennas for better signal reception. Remember that the quality of your wifi signal is affected by various factors such as distance, physical obstacles, and interference from other electronic devices. By strategically positioning your wifi antennas and ensuring a secure connection, you can optimize your internet connection and enjoy seamless wifi performance. In summary, wifi antennas are vital for establishing a wireless internet connection on your motherboard. They boost signal strength, enhance signal range, and improve overall wifi performance. By properly connecting and optimizing the placement of your wifi antennas, you can enjoy a reliable and fast internet connection for all your online activities.Checking Wifi Antenna Placement
To connect a WiFi antenna to your motherboard, start by checking the placement of the antenna. Ensure it is positioned in a location that provides optimal signal strength. Attach the antenna to the WiFi card antenna outlets on the rear of your PC, screwing them on until finger tight.
Experiment with the angle of the antenna until you achieve the best reception.
Finding The Optimal Location For Wifi Antenna Placement
When it comes to setting up your motherboard’s wifi antenna, finding the optimal location is crucial to ensure you get the best signal strength and stable internet connection. Placing the antenna in the right position can make a significant difference in the overall performance of your wifi. Here’s what you need to consider:
Factors To Consider For Better Signal Strength
1. Distance from Router: The closer the antenna is to your router, the stronger the signal will be. Ensure that your computer is located in a position where it’s within a reasonable distance from the router for optimal signal reception.
2. Obstacles: Keep in mind that physical obstacles such as walls, furniture, and other electronic devices can hinder the wifi signal. Try to position your computer and antenna in a way that minimizes the number of obstacles between them.
3. Interference: Wifi signals can be affected by interference from other devices like microwaves, cordless phones, and Bluetooth devices. To avoid interference, keep your antenna away from such devices and ensure they are not obstructing the line of sight between your computer and the router.
4. Antenna Placement: Depending on the make and model of your motherboard, the antenna can be attached to the rear I/O panel or directly to the wifi card. If it’s on the rear I/O panel, make sure to screw it onto the threaded studs provided. If it attaches directly to the wifi card, follow the manufacturer’s instructions for proper installation.
5. Angle and Rotation: Once attached, the antennas can be angled or rotated to improve signal reception. Experiment with the angle and orientation of the antenna until you find the position that provides the best reception. Small adjustments in angle can sometimes make a significant difference in signal strength.
By considering these factors and finding the optimal location for your wifi antenna placement, you can ensure better signal strength and enjoy a seamless internet experience on your computer.
Attaching Wifi Antenna To The Motherboard
To connect a WiFi antenna to the motherboard, locate the rear I/O panel of your motherboard and attach the antenna to the threaded studs in a golden color. Make sure to position the antenna in a location that provides the best signal strength for optimal performance.
Experiment with the angle until you find the best reception.
Step-by-step Guide To Connecting Wifi Antenna
To ensure a strong and stable wireless connection, it is important to properly attach the wifi antenna to the motherboard. Follow these simple steps to connect the wifi antenna:- Step 1: Check the placement of the antenna
- Step 2: Identify the connectors on the motherboard
- Step 3: Attach the antenna
- Step 4: Adjust the antenna position
Before attaching the wifi antenna, ensure that it is positioned in a location that provides the best signal strength. This will help to optimize your wireless connection.
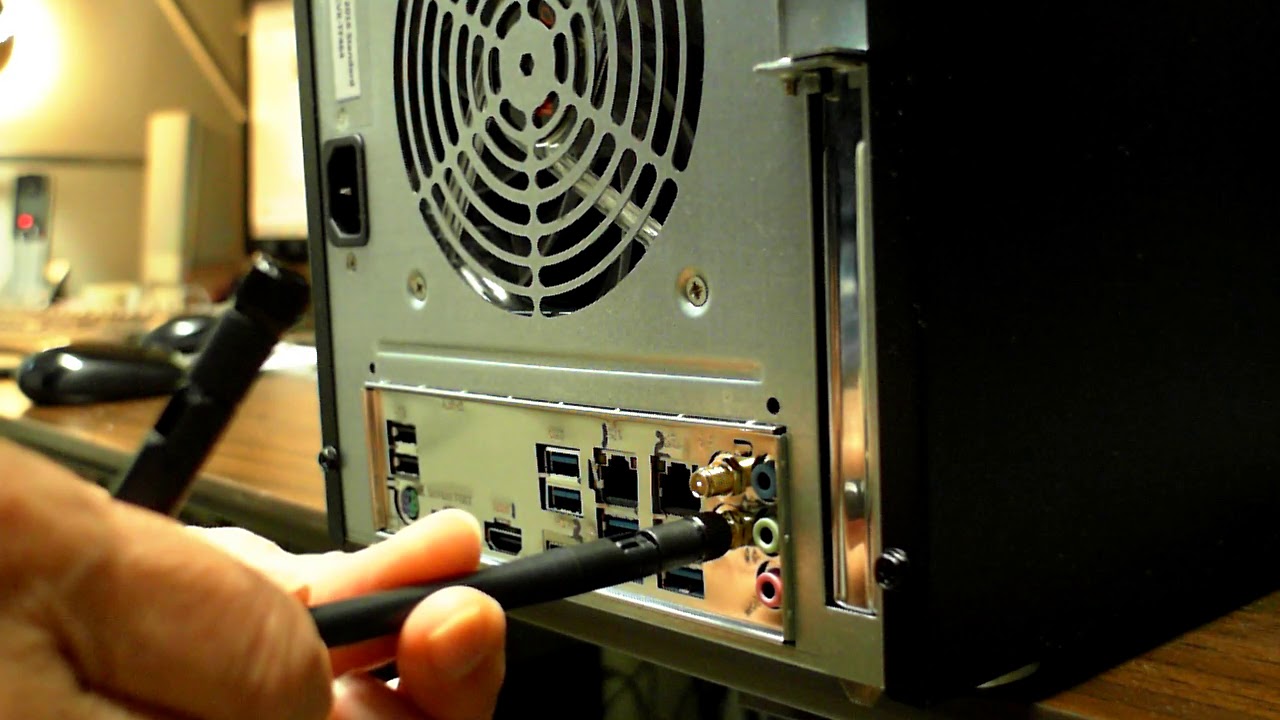
Take a look at the backside of your motherboard, specifically on the rear I/O Panel. You will notice two threaded studs in a golden color. These are the connectors where you will attach the wifi antenna.
Using the provided connectors on the wifi antenna, screw it onto the threaded studs on the motherboard. Make sure to tighten it securely, but be careful not to overtighten.
Once the antenna is attached, you have the flexibility to adjust its position. Experiment with different angles or rotations, aiming to find the best reception. This will help to improve the wireless performance of your connection.
Troubleshooting Wifi Antenna Connection Issues
To connect a WiFi antenna to a motherboard, locate the rear I/O Panel on the backside of the motherboard. Look for two threaded studs in a golden color where you can connect the antenna. Ensure that the antenna is positioned in a location that provides the best signal strength for optimal WiFi performance.
Common Problems And Solutions When Connecting Wifi Antenna To Motherboard
Connecting a wifi antenna to your motherboard is a crucial step in ensuring a stable and reliable internet connection. However, there are some common problems that you might encounter during the process. Here are a few issues you might face and their corresponding solutions:
- Problem 1: Poor Signal Strength
- Problem 2: Loose Connection
- Problem 3: Incompatible Antenna
If you’re experiencing weak or inconsistent wifi signal, it could be because of the antenna’s placement.
Solution: Make sure the antenna is positioned in a location that provides the best signal strength. Experiment with different angles and positions to find the optimal placement for your setup.
If the wifi antenna is not securely connected to the motherboard, it can result in a weak or no signal.
Solution: Check the connection between the antenna and the motherboard. Ensure that it is tightly screwed in and properly seated in the designated antenna ports.
Not all wifi antennas are compatible with every motherboard. Using an incompatible antenna can lead to connectivity issues.
Solution: Verify that the wifi antenna you are using is specifically designed for your motherboard. Consult the motherboard’s manual or manufacturer’s website for compatibility information.
Troubleshooting Tips For Resolving Connectivity Issues
If you’re encountering connectivity issues despite properly connecting the wifi antenna to your motherboard, here are a few troubleshooting tips to help you resolve the problem:
- Check Wifi Driver: Ensure that the wifi driver is installed and up to date. Outdated or missing drivers can cause connectivity issues.
- Reset Network Settings: Sometimes, resetting your network settings can resolve connectivity problems. Go to your computer’s network settings and choose the option to reset network settings.
- Reposition Antenna: Try repositioning the antenna to a different location. Sometimes, simply changing the antenna’s position can improve signal strength.
- Disable Interference: Check for any sources of interference near your wifi setup, such as other electronic devices or appliances. Try moving them away from the antenna to minimize interference.
- Update Firmware: Make sure that your motherboard’s firmware is updated to the latest version. Firmware updates can often fix bugs and improve compatibility.
- Replace Antenna: If none of the above solutions work, you may need to consider replacing the wifi antenna altogether. Sometimes, antennas can become faulty and may need to be replaced with a new one.
By following these troubleshooting tips, you can resolve most wifi antenna connection issues and ensure a smooth and stable internet connection.
Using Compatible Wifi Antennas For Motherboards
To connect a WiFi antenna to your motherboard, locate the wifi card antenna outlets on the rear of your PC and attach the antennas by screwing them on until finger tight. Experiment with different angles until you find the best reception.
Avoid poor reception by positioning the antennas in a location that provides the strongest signal strength.
Factors To Consider When Choosing The Right Wifi Antenna For Your Motherboard
When it comes to selecting a wifi antenna for your motherboard, there are a few factors that you should consider to ensure optimal performance. Choosing the right antenna can make a significant difference in the strength and stability of your wireless connection. Here are some key factors to keep in mind:
- Antenna Gain: The gain of an antenna refers to its ability to focus the wifi signal in a specific direction. Higher gain antennas can provide a stronger signal over longer distances, but they may have a narrower coverage area. Consider the size of your space and the location of your router when selecting the antenna with the appropriate gain.
- Frequency: Wifi operates on two main frequency bands – 2.4GHz and 5GHz. While 2.4GHz has better range, 5GHz offers faster speeds. Some wireless adapters and motherboards support only one frequency band, so make sure to check compatibility before purchasing an antenna.
- Connector Type: Wifi antennas come with different connector types, such as RP-SMA or U.FL. It’s crucial to ensure that the antenna’s connector is compatible with the wifi card or motherboard you are using. Mismatched connector types will result in poor or no signal reception.
- Physical Size: The size of the antenna is important, especially if you have limited space or plan to install it in a small form factor PC. Larger antennas may offer higher gain, but they might not fit properly or cause interference in compact systems.
- Antenna Type: There are various antenna types available, including omnidirectional and directional antennas. Omnidirectional antennas provide a 360-degree coverage pattern, while directional antennas focus the signal in a specific direction. Consider your specific needs and the layout of your space to determine which type of antenna is best suited for you.
Compatibility Considerations For Optimal Performance
For optimal performance and seamless connectivity, it’s essential to ensure that the wifi antenna you choose is compatible with your motherboard. Here are a few compatibility considerations you should keep in mind:
- Check Motherboard Documentation: Refer to the motherboard’s documentation or visit the manufacturer’s website to determine if the motherboard has built-in wifi capability. If it does, you may not need an additional antenna. However, if there are antenna connectors on the motherboard, connecting an external antenna can often provide better signal quality.
- Research Wifi Card Specification: If your motherboard requires a separate wifi card for wireless connectivity, make sure to research the specifications of the wifi card to determine the compatible antennas. The wifi card’s product page or user manual usually provides information about the type of antennas supported.
- Consider Wireless Standards: Different wifi cards and motherboards support specific wireless standards, such as 802.11ac or 802.11ax. Ensure that the antenna you choose supports the same standard as your wifi card to take full advantage of the available speeds and features.
- Test and Experiment: In some cases, using a generic or compatible wifi antenna might work, but to achieve the best performance and range, it’s always recommended to use the antenna recommended or provided by the motherboard manufacturer. Experiment with different angles and placements of the antenna to find the optimal position for signal reception.
By considering these factors and ensuring compatibility between your wifi antenna and motherboard, you can enhance your wireless experience with stronger signals and faster speeds. Take the time to research and choose the right antenna, and you’ll enjoy a reliable and efficient wireless connection for your system.

Credit: linustechtips.com
Frequently Asked Questions On How To Connect Wifi Antenna To Motherboard
Can I Use Any Wifi Antenna With My Motherboard?
Yes, you can use any WiFi antenna with your motherboard as long as they have the same fitting. However, using a different antenna may result in lower performance. Attach the antenna to the rear of your PC’s WiFi card antenna outlets and experiment with the angle for the best reception.
Where Do I Connect My Wifi Antenna To My Computer?
To connect your WiFi antenna to your computer, attach it to the WiFi card antenna outlets on the rear of your PC. Screw the antennas on until finger tight and adjust their angle for the best reception. Experiment with positioning until you find the optimal signal strength.
How Do I Connect A Wifi Antenna To The Motherboard?
To connect a WiFi antenna to the motherboard, locate the threaded studs on the rear I/O Panel of your motherboard. Attach the antenna to these studs and secure them tightly. This will ensure a strong and stable WiFi connection.
What Is The Purpose Of Wifi Antennas For Motherboards?
WiFi antennas are used to improve the wireless signal reception on a motherboard. They help to amplify and extend the range of the WiFi connection, providing better internet connectivity and faster data transfer speeds.
Conclusion
To connect a WiFi antenna to your motherboard, locate the threaded studs on the rear I/O panel of the motherboard. Insert the antenna screw through one of the holes on the IO shield and secure it with a nut and tension ring.
Make sure the antenna is positioned in a location that provides the best signal strength. Experiment with the angle and rotation of the antenna until you find optimal reception. Avoid using any WiFi antenna that does not have the same fitting as your motherboard, as it may result in lower performance.
With these steps, you can easily connect a WiFi antenna to your motherboard and enjoy a stable internet connection.


Leave a Reply