To enable XMP on a Biostar motherboard, restart your computer and press the appropriate key at the start of the boot to enter the BIOS. Look for the XMP settings and enable them.
Before enabling XMP, make sure to update your motherboard BIOS to the latest version and clear the CMOS. Adjusting or enabling the XMP profile can help improve memory performance for your Biostar motherboard.
Understanding Xmp
To enable XMP on Biostar motherboards, restart your computer and access the BIOS by pressing the appropriate key during boot. Look for the XMP menu and enable it to optimize your memory performance. Remember to update your motherboard’s BIOS and clear the CMOS before enabling XMP.
What Is Xmp And Why Is It Important For Performance?
XMP, which stands for Extreme Memory Profile, is an Intel technology that allows you to overclock your computer’s memory for better performance. By enabling XMP, you can unleash the full potential of your memory modules, allowing them to operate at higher speeds than their default settings. This is particularly useful for gamers, content creators, and anyone who needs their system to run at peak performance.
How Does Xmp Affect Memory Overclocking?
Memory overclocking involves increasing the frequency and timings at which your memory modules operate. XMP makes memory overclocking much simpler and easier by providing predefined profiles that automatically adjust the memory settings in your computer’s BIOS. These profiles are created and tested by memory manufacturers, guaranteeing stable overclocking performance without the need for manual configuration. By enabling XMP, you can achieve faster memory speeds without delving into complex BIOS settings.
Benefits Of Enabling Xmp On Biostar Motherboards
Biostar motherboards, renowned for their reliability and performance, fully support XMP technology. Enabling XMP on Biostar motherboards offers several key benefits:
- Boosted Performance: XMP allows your memory modules to operate at their maximum speed and timing settings, providing significant performance gains. This translates to faster load times, improved multitasking capabilities, and smoother overall system operation.
- Simple Setup: Enabling XMP on Biostar motherboards is a straightforward process. By entering your computer’s BIOS, you can easily locate the XMP menu and enable the desired profile. Biostar’s user-friendly BIOS interface ensures a hassle-free experience.
- Stability and Compatibility: Biostar motherboards are engineered to be fully compatible with XMP profiles, ensuring optimal stability during memory overclocking. These motherboards undergo rigorous testing to ensure compatibility with a wide range of memory modules, giving you peace of mind.
Conclusion
Enabling XMP on your Biostar motherboard is an excellent way to maximize the performance of your computer’s memory. With the ability to achieve higher memory speeds and improved stability, XMP enhances your overall computing experience, whether you’re gaming, editing, or simply navigating through daily tasks. Take advantage of Biostar’s robust motherboard capabilities and unlock the full potential of your system with XMP.
Credit: www.biostar.com.tw
Checking Motherboard Compatibility
To enable XMP on a Biostar motherboard, you need to access your computer’s BIOS and navigate to the XMP menu. Make sure to update your motherboard’s BIOS to the latest version and clear the CMOS before enabling XMP. This feature allows for simple RAM overclocking and improved memory performance.
How To Verify If Your Biostar Motherboard Supports Xmp
To ensure you can enable XMP on your Biostar motherboard, you’ll need to first check its compatibility. Follow these steps to verify if your Biostar motherboard supports XMP:
- Start your computer and press the appropriate key at the start of the boot process to enter the BIOS. The key to access the BIOS may vary depending on your motherboard model, but common keys are F2, F10, or Delete. Consult your motherboard manual for the specific key.
- Once you’re in the BIOS, navigate to the “Advanced” or “Overclocking” section. The exact location may vary depending on your motherboard model.
- Look for an option named “XMP” or “Extreme Memory Profile”. If you find this option, it means your Biostar motherboard supports XMP.
If you’re unable to find the XMP option in the BIOS, it may indicate that your motherboard does not support XMP. In this case, upgrading to a compatible motherboard would be necessary to enable XMP.
Steps To Identify The Bios Version And Update If Necessary
Before enabling XMP, it’s important to ensure that your Biostar motherboard has the latest BIOS version installed. Follow these steps to identify the BIOS version and update if necessary:
- Restart your computer and enter the BIOS using the appropriate key during the boot process.
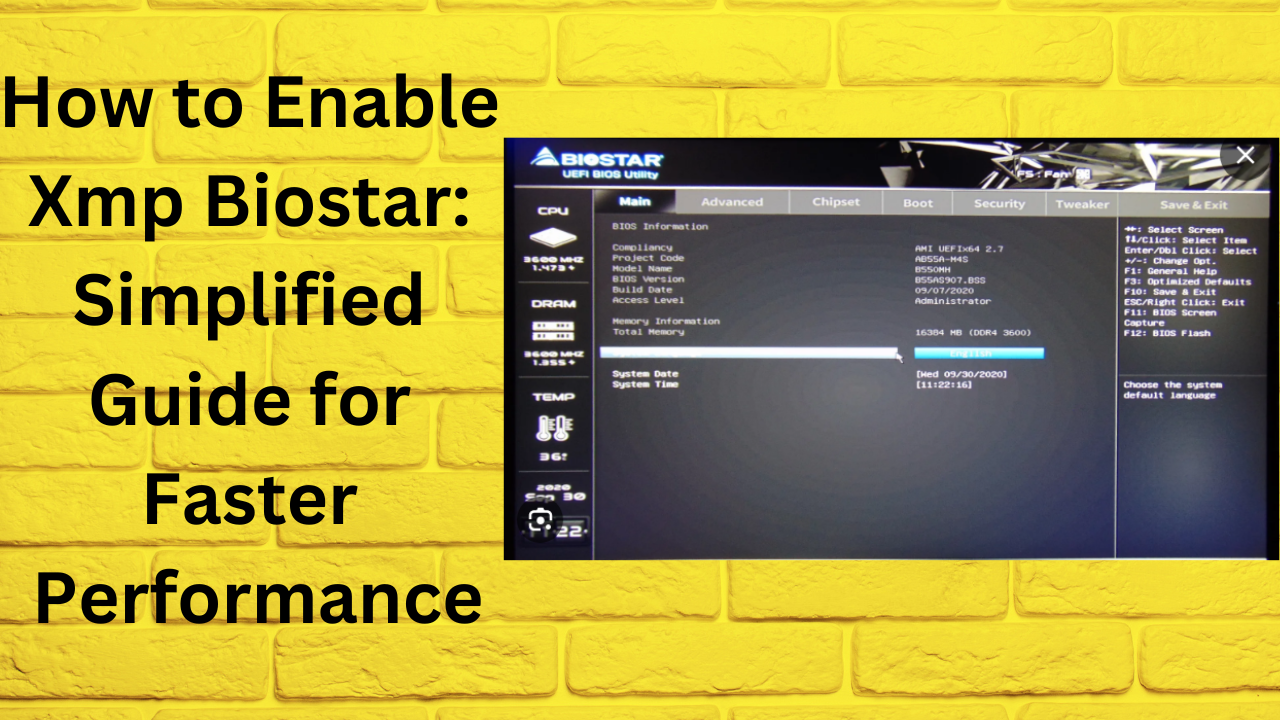
- Navigate to the “Main” or “System Information” section of the BIOS.
- Look for the “BIOS Version” or “Firmware Version” information. Note down the current version.
- Exit the BIOS and restart your computer.
- Visit the official Biostar website and go to the support section.
- Search for your motherboard model in the support section and locate the latest BIOS version available.
- If the latest BIOS version is newer than your current version, download it to a USB flash drive.
- Restart your computer and enter the BIOS again using the appropriate key.
- Navigate to the “BIOS Update” or “BIOS Flash” section.
- Select the option to update the BIOS using the file from the USB flash drive.
- Follow the on-screen instructions to complete the BIOS update process.
After successfully updating your Biostar motherboard’s BIOS, you’ll be ready to proceed with enabling XMP.
Clearing The Cmos Before Enabling Xmp
Before enabling XMP, it’s recommended to clear the CMOS (Complementary Metal-Oxide-Semiconductor) settings on your Biostar motherboard. This helps reset any previous overclocking or memory settings that may interfere with the XMP profile. Follow these steps to clear the CMOS:
- Shut down your computer and disconnect the power cord.
- Locate the CMOS Clear jumper on your Biostar motherboard. Refer to the motherboard manual or visit the Biostar website for the specific location.
- Using a small jumper cap or a metal object, short the two pins of the CMOS Clear jumper for a few seconds.
- Remove the jumper cap or metal object from the CMOS Clear jumper.
- Reconnect the power cord and start your computer.
Clearing the CMOS ensures a clean slate for enabling XMP, allowing for optimal performance and stability.
Accessing The Bios Settings
To enable XMP on your Biostar motherboard, you will need to access the BIOS settings. Restart your computer and press the appropriate key at the start of the boot process to enter the BIOS. From there, look for the XMP menu and enable it to optimize your memory performance.
Rebooting The Computer And Accessing The Bios
When it comes to enabling XMP on Biostar motherboards, the first step is to access the BIOS settings. This can be done by rebooting your computer and pressing the appropriate key at the start of the boot process. The key to access the BIOS may vary depending on your motherboard model, but common keys include Del, F2, or F10.Instructions On How To Enter The Bios On Biostar Motherboards
- Reboot your computer.
- When the computer starts up, look for a message on the screen indicating which key to press to enter the BIOS. This message is usually displayed in the lower left or right corner of the screen.
- Press the designated key to enter the BIOS. This is typically Del, F2, or F10.
Locating The Xmp Settings Within The Bios Menu
Once you have entered the BIOS, you will need to locate the XMP settings to enable it. The exact location of these settings may vary depending on your motherboard model, but they are usually found under the “Memory” or “Overclocking” section of the BIOS menu. To find the XMP settings, navigate through the BIOS menu using the arrow keys on your keyboard. Look for options related to memory or overclocking. Once you have found the XMP settings, you can enable it by selecting the appropriate option and saving the changes. It’s important to note that before enabling XMP, it is recommended to update your motherboard’s BIOS to the latest version and clear the CMOS. This ensures that you have the most up-to-date features and stability for your system. In conclusion, accessing the BIOS settings on Biostar motherboards is the first step in enabling XMP. By following the instructions provided and locating the XMP settings within the BIOS menu, you can optimize the performance of your memory and enjoy improved system performance.Enabling Xmp
To enable XMP on a Biostar motherboard, restart your computer and press the appropriate key to access the BIOS. Look for the XMP menu in the BIOS settings and enable it. Make sure to update your motherboard BIOS and clear the CMOS before enabling XMP.
Step-by-step Guide To Enable Xmp On Biostar Motherboards
To enable XMP on your Biostar motherboard, you’ll need to follow these step-by-step instructions:
- Restart your computer and press the appropriate key to enter the BIOS. The key is usually displayed at the start of the boot process, but it can vary depending on the motherboard model.
- Once you’re in the BIOS, navigate to the “Settings” or “Advanced” tab using the arrow keys. Look for an option called “XMP Settings” or “Extreme Memory Profile” and select it.
- Enable the XMP menu by selecting the option to enable or disable it. This will allow you to adjust the XMP settings for your memory.
- After enabling the XMP menu, you may be prompted to update your motherboard’s BIOS to the latest version. It is recommended to update to the latest version for optimal performance.
- Once you’ve updated the BIOS, you can adjust the XMP profile settings. These settings will vary depending on your specific memory modules, but they typically include options for frequency, voltage, and timing.
- Make sure to save your changes before exiting the BIOS. This will apply the XMP settings and optimize your memory performance.
Common Issues And Troubleshooting Tips When Enabling Xmp
Enabling XMP on Biostar motherboards can sometimes lead to issues or compatibility problems. Here are some common issues you may encounter and troubleshooting tips to help resolve them:
- If your system fails to boot or crashes after enabling XMP, try manually adjusting the memory frequency, voltage, or timings to more stable values.
- Make sure that your memory modules are properly seated in their slots and that they are compatible with your motherboard.
- If XMP is not appearing as an option in the BIOS menu, it may be due to an outdated BIOS version. Update the BIOS to the latest version to ensure XMP functionality.
- Resetting the CMOS can sometimes resolve issues related to XMP. Refer to your motherboard’s manual for instructions on how to clear the CMOS.
- If you continue to experience issues after trying these troubleshooting tips, it may be helpful to reach out to Biostar support for further assistance.
Best Practices For Adjusting Xmp Settings For Optimal Performance
When adjusting XMP settings on Biostar motherboards, it’s important to follow some best practices for optimal performance:
- Start by enabling the XMP menu and selecting the appropriate XMP profile for your memory modules. These profiles are preconfigured by the memory manufacturer for optimal performance.
- Monitor the system stability and temperatures after applying the XMP settings. If you encounter any issues, such as system instability or overheating, try adjusting the frequency, voltage, or timings to more stable values.
- Regularly update your BIOS to the latest version to ensure compatibility with new memory modules and to benefit from any performance improvements or bug fixes.
- Consider benchmarking your system before and after applying the XMP settings to gauge the performance improvement. This can help you determine whether the adjustments are providing the desired results.
- Keep in mind that overclocking your memory may void the warranty on your memory modules or motherboard, so proceed with caution and ensure proper cooling is in place.
Testing And Verifying Xmp
To enable XMP on Biostar motherboards, restart your computer and press the appropriate key at the start of the boot to enter BIOS. Then, navigate to the XMP menu and enable it. Make sure to update your motherboard BIOS and clear the CMOS before enabling XMP.
Biostar also provides support for Intel Extreme Memory Profile (XMP) and offers a user-friendly interface for memory overclocking.
How To Verify If Xmp Is Enabled And Working Correctly
To ensure XMP is enabled and working correctly on your Biostar AMD motherboard, you can follow these steps:
- Restart your computer and press the appropriate key at the start of the boot process to enter the BIOS settings.
- Navigate to the XMP menu in the BIOS. This menu may be named differently depending on your motherboard model.
- Enable the XMP profile.
- Save and exit the BIOS settings.
- Boot into your operating system and check if XMP is enabled and working correctly.
By following these steps, you can quickly verify if XMP is properly enabled on your Biostar motherboard and ensure that your memory is running at the optimized speeds.
Tools And Software For Monitoring Memory Performance
After enabling XMP, it’s essential to monitor your memory performance to ensure stability and optimal operation. Here are some tools and software you can use:
- Biostar overclocking utility: Biostar provides an overclocking utility that allows you to monitor and adjust memory settings, including XMP profiles.
- Third-party software: There are several third-party software options available, such as CPU-Z, HWMonitor, and AIDA64, which can monitor memory performance and provide detailed information about XMP settings.
Using these tools and software, you can keep an eye on your memory performance and make sure that XMP is functioning correctly.
Tips For Stress Testing And Stability Checks After Enabling Xmp
Once XMP is enabled on your Biostar motherboard, it’s crucial to perform stress testing and stability checks to ensure that your system can handle the increased memory speeds. Here are a few tips:
- MemTest86: Use MemTest86 or a similar memory testing tool to thoroughly test your system’s stability under heavy loads.
- Prime95: Run Prime95 to stress test your CPU and memory to check for any instability issues.
- Monitor temperatures: Keep an eye on your system’s temperatures using tools like HWMonitor to ensure that the increased memory speeds are not causing excessive heat.
- Adjust voltage settings: If you encounter stability issues, you may need to adjust your memory voltage settings in the BIOS to provide additional stability.
By following these tips and performing stress tests and stability checks, you can ensure that your system is running smoothly with XMP enabled and that your memory is operating at its full potential.
Frequently Asked Questions On How To Enable Xmp Biostar
How Do I Enable Xmp In My Bios?
To enable XMP in your BIOS, restart your computer and press the appropriate key at the start of the boot. Look for the XMP menu in your BIOS settings and enable it. Make sure to update your motherboard BIOS and clear the CMOS before enabling XMP.
How To Overclock Ram Biostar?
To overclock RAM on Biostar, follow these steps: 1. Restart your computer and enter the BIOS by pressing the appropriate key at startup. 2. Look for the XMP menu and enable it. 3. Update your motherboard’s BIOS to the latest version and clear the CMOS before enabling XMP.
4. Adjust or enable the XMP profile according to your preferences. 5. Make sure to save the changes before exiting the BIOS menu.
Why Does Xmp Not Show Up In Bios?
XMP may not show up in BIOS if your motherboard does not support it. Some motherboards do not have the option to enable XMP or may grey it out. In this case, you will need to upgrade your motherboard to use XMP.
How To Enable Secure Boot In Biostar Bios?
To enable Secure Boot in Biostar BIOS, restart your computer and press the appropriate key at the start of the boot. Then navigate to the BIOS settings, find the Secure Boot option, and enable it. Remember to save and exit the BIOS settings to apply the changes.
Conclusion
To enable XMP on a Biostar motherboard, follow these simple steps. First, restart your computer and enter the BIOS settings by pressing the appropriate key during startup. Look for the XMP menu and enable it if it’s not already. It’s recommended to update your motherboard’s BIOS to the latest version and clear the CMOS before enabling XMP.
Once you’ve adjusted the XMP profile, make sure to save your changes. By following these steps, you can optimize your memory performance and enjoy a smoother computing experience.


Leave a Reply