
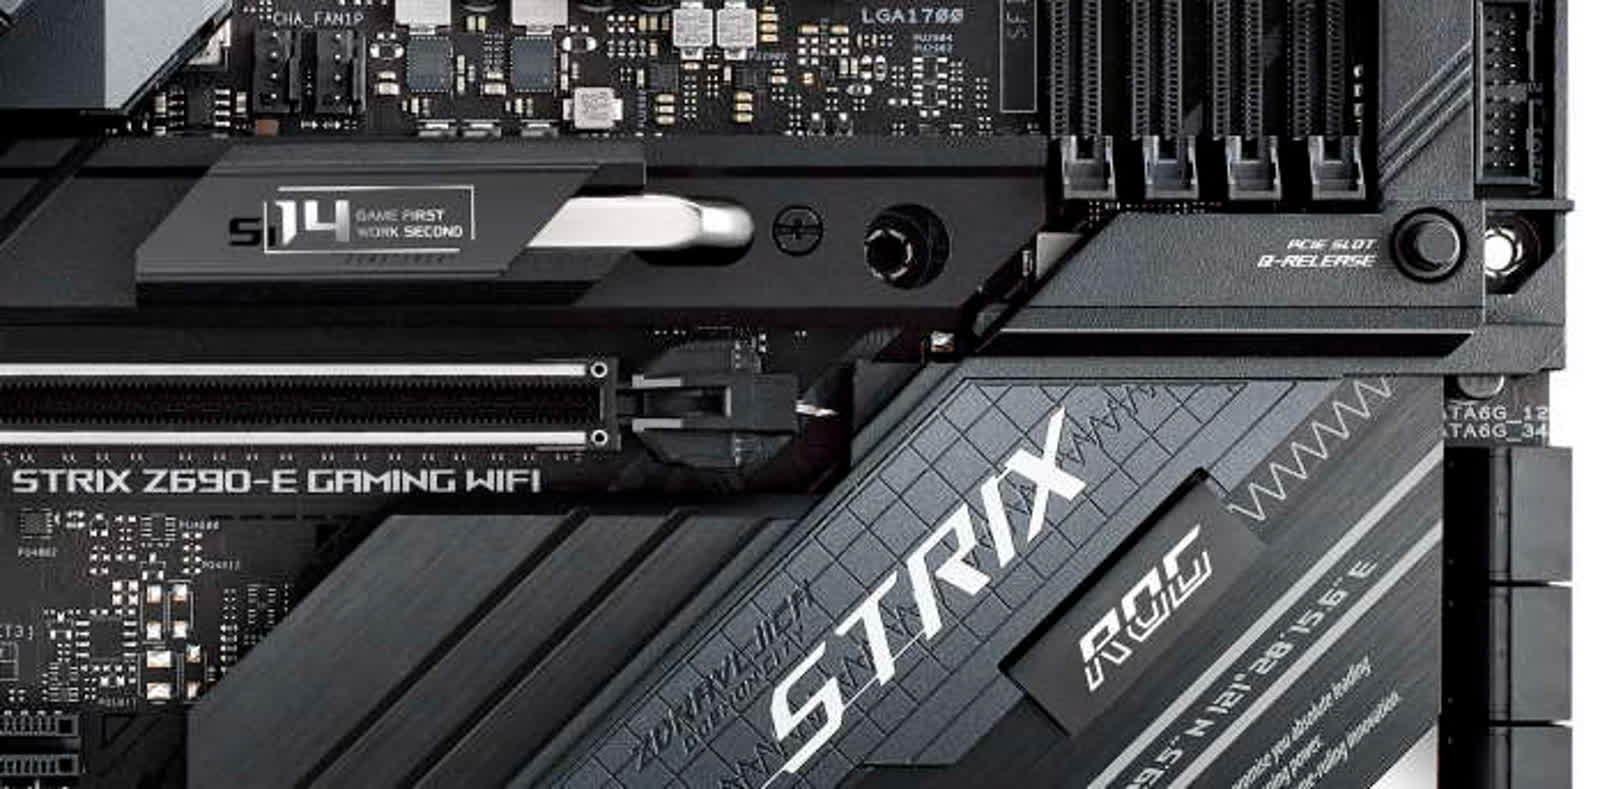
To remove a GPU from a motherboard, disconnect the PCIe cable from the graphics card and press down the clip on the cable to release the connector. Then, use a Phillips screwdriver to remove the two screws holding down the GPU to the PCIe slots on the back of the PC, and press down on the PCIe latch to completely release the GPU.
Removing a GPU from a motherboard may be necessary for various reasons, such as upgrading or replacing the graphics card. When performing this task, it is essential to follow the correct steps to avoid damaging the components. In this guide, we will provide a concise and straightforward explanation of how to remove a GPU from a motherboard to ensure a smooth process.
Whether you are a beginner or an experienced PC user, these instructions will help you safely detach your graphics card from the motherboard without any complications.
Step 1: Disconnect The Pcie Cable
Before you can remove the GPU from your motherboard, the first step is to disconnect the PCIe cable that is connected to the graphics card. This cable provides power to the GPU and allows it to communicate with the motherboard. To disconnect the PCIe cable, you need to follow these steps:
Press Down The Clip On The Pcie Cable To Release The Connector.
Locate the PCIe cable that is connected to the graphics card. This cable has a clip that holds it securely in place. To release the connector, press down on the clip with your thumb or fingers. You will feel a click as the clip releases, indicating that the cable is no longer connected.
Use A Phillips Screwdriver To Remove The Two Screws Holding Down The Gpu To The Pcie Slots On The Back Of The Pc.
Next, you need to remove the screws that are holding the GPU in place. These screws are typically located on the back of the PC, near the PCIe slots. Use a Phillips screwdriver to carefully remove the two screws and set them aside.
Press Down On The Pcie Latch To Completely Release The Gpu.
Once the screws are removed, you can now release the GPU from the motherboard. Locate the PCIe latch, which is usually located on the right side of the graphics card slot. Press down on the latch with your thumb or fingers to release the GPU. You may need to gently wiggle the GPU to fully disengage it from the slot.
With the PCIe cable disconnected and the GPU released from the motherboard, you have successfully completed the first step in removing a GPU from a motherboard. Now, you can move on to the next steps to safely remove the graphics card from your PC.
Step 2: Remove The Gpu Screws
To remove a GPU from a motherboard, start by disconnecting the PCIe cable from the graphics card, pressing down the clip on the cable to release it. Then, using a Phillips screwdriver, remove the two screws holding down the GPU to the PCIe slots on the back of the PC.
Finally, press down on the PCIe latch to completely release the GPU.
Once you have disconnected the PCIe cable from the graphics card, the next step is to remove the screws holding the GPU to the PCIe slots on the back of your PC. To do this, you will need a Phillips screwdriver. Here’s how you can remove the GPU screws:- Locate the two screws holding down the GPU to the PCIe slots on the back of your PC.
- Using a Phillips screwdriver, carefully unscrew these two screws. Make sure to keep them in a safe place as you will need them later when installing a new GPU.
Tools Needed: Phillips Screwdriver
To remove the GPU screws, you will need a Phillips screwdriver. This tool is commonly used for various tasks involving screws, and it comes in different sizes. For removing GPU screws, make sure to use a Phillips screwdriver that fits the size of the screws securely. Using the right tool will ensure that you can easily remove the screws without damaging them or the surrounding components.Important Note:
Before proceeding to remove the GPU screws, ensure that you have disconnected the PCIe cable from the graphics card and have pressed down on the clip to release the connector. This will prevent any accidental damage to the GPU or the motherboard. Remember, handling delicate computer components requires precision and caution. Take your time to follow the steps carefully and avoid rushing through the process. By removing the GPU screws, you are one step closer to successfully removing the graphics card from your motherboard. In the next step, we will guide you on how to release the GPU from the PCIe slot by pressing down on the PCIe latch. Stay tuned for the next section of our guide on how to remove a GPU from a motherboard. Stay connected with us for more expert tips on hardware troubleshooting and upgrades!Step 3: Release The Gpu
To remove a GPU from a motherboard, start by disconnecting the PCIe cable from the graphics card and pressing down on the clip to release the connector. Then, use a Phillips screwdriver to remove the two screws holding down the GPU to the PCIe slots on the back of the PC.
Finally, press down on the PCIe latch to completely release the GPU.
To proceed with removing the GPU from your motherboard, it’s crucial to follow this step carefully. By releasing the GPU properly, you can ensure a smooth and hassle-free removal process. Here’s how you can do it:- Locate the PCIe latch on the motherboard. This latch is responsible for securing the GPU in place.
- Press down firmly on the PCIe latch with your fingers.
- As you press down on the latch, you will notice that it releases the GPU.
- Continue pressing down until you feel the GPU becoming loose.
- Once the GPU is completely released, you can gently lift it out of the PCIe slot.
Tips For Difficult Situations
Removing a GPU from a motherboard can sometimes present challenges, especially in difficult situations. Here are some tips to help:
If The Gpu Is Stuck, Hold The Tab Down While Lifting It Up Or Try Jiggling It Gently.
If you encounter a situation where the GPU seems to be stuck in its slot, don’t panic. One effective technique is to hold the tab down firmly while lifting the GPU up. This can help release any stubborn connections or clips that may be holding the GPU in place. Alternatively, you can try gently jiggling the GPU while holding the tab down, as this can help loosen any tight connections and make it easier to remove.
For Gpus With Big Air Coolers Or Backplates, Use A Thin Plastic Tool To Push Down On It If Necessary.
Big air coolers or backplates can make removing a GPU more challenging. In such cases, a handy trick is to use a thin plastic tool to push down on the cooler or backplate gently. This will help alleviate any pressure or tension and make it easier to remove the GPU without causing any damage. Remember to be cautious and gentle while applying pressure so as not to break or bend any components.
By following these tips, you can navigate difficult situations when removing a GPU from a motherboard. Remember to exercise patience, caution, and gentle movements to ensure a successful removal process. If you’re ever uncertain or encounter significant resistance, it’s always wise to seek professional help to avoid any potential damage to your hardware.
Precautions Before Removal
To remove a GPU from a motherboard, first disconnect the PCIe cable by pressing down on the clip and gently pulling it away. Then, use a Phillips screwdriver to remove the screws holding the GPU in place. Press down on the PCIe latch to fully release the GPU from the PCIe slots on the back of the PC.
Before removing a GPU from your motherboard, it’s important to take some precautions to ensure a smooth and safe process. By following a few simple steps, you can minimize the risk of damage to your hardware and maximize the chances of a successful removal. Here are some precautionary measures to consider:
Completely Turn Off Your Computer.
Before starting the removal process, it is crucial to completely power off your computer. This prevents any potential electrical surge or damage that may occur during the removal process. To do this, simply shut down your computer using the operating system’s shutdown option.
Turn Off The Power Supply And Unplug Its Dedicated Cable From The Back.
In addition to shutting down your computer, it is equally important to turn off the power supply and unplug its dedicated cable from the back. This step ensures that no residual power is coursing through your system, reducing the risk of electrical shock or damage to your components.
To turn off the power supply, locate the power switch on the back of your computer case and switch it to the “Off” position. Once done, unplug the power cable, which is typically connected to the back of the case.
By taking these precautions and adhering to the correct procedures, you can safely remove your GPU from the motherboard without encountering any issues. Remember to handle your hardware components with care and ensure proper grounding to prevent any static electricity damage. Following these precautions will help protect your investment and ensure a smooth removal process.
Credit: www.techspot.com
Additional Considerations
To remove a GPU from a motherboard, start by disconnecting the PCIe cable from the graphics card and pressing down on the clip to release the connector. Then, use a screwdriver to remove the two screws holding down the GPU to the PCIe slots on the back of the PC.
Finally, press down on the PCIe latch to completely release the GPU.
When removing a GPU from a motherboard, there are a few additional considerations to keep in mind. These considerations include removing the display cables before removing the GPU and understanding that swapping the CPU and video card does not necessarily require replacing the motherboard.
Remove The Display Cables Before Removing The Gpu
Before removing the GPU from the motherboard, it is important to remove the display cables. This ensures that the GPU is not damaged and that the process of removing the GPU is smooth.
To remove the display cables, locate the cables connecting the GPU to the monitor or display. These cables are usually HDMI, DisplayPort, or DVI cables. Carefully unplug these cables from the GPU, ensuring that no force is applied that could damage the connectors or the GPU itself.
Swapping The Cpu And Video Card Does Not Require Replacing The Motherboard
One common misconception is that swapping the CPU and video card requires replacing the motherboard. However, this is not always the case. In many instances, you can swap out the CPU and video card without needing to invest in a new motherboard.
Before performing any upgrades or replacements, it is essential to ensure compatibility between the CPU, video card, and motherboard. Check the specifications and requirements of each component to ensure they are compatible with one another. This will save you time, money, and potential compatibility issues in the long run.
Remember, swapping out the CPU and video card can significantly improve your computer’s performance without the need for an entirely new system. It is an excellent way to upgrade your system without breaking the bank.
Frequently Asked Questions On How To Remove A Gpu From A Motherboard
Can You Replace A Gpu On A Motherboard?
Yes, you can replace a GPU on a motherboard. To do so, disconnect the PCIe cable from the graphics card, remove the screws holding it down, and press down on the PCIe latch to release the GPU. Make sure to check compatibility before upgrading.
How Do I Remove A Graphics Card From An Old Computer?
To remove a graphics card from an old computer, first, disconnect the PCIe cable by pressing down the clip on the cable connector. Then use a Phillips screwdriver to remove the screws holding the GPU to the PCIe slots on the back of the PC.
Finally, press down on the PCIe latch to fully release the GPU.
How Do I Completely Remove My Graphics Card?
To completely remove your graphics card, follow these steps: 1. Disconnect the PCIe cable by pressing down the clip on the cable connector. 2. Use a Phillips screwdriver to remove the screws securing the GPU to the PCIe slots at the back of your PC.
3. Press down on the PCIe latch to fully release the GPU from the motherboard.
How To Unclip Gpu From Motherboard Reddit?
To unclip the GPU from the motherboard, follow these steps: 1. Disconnect the PCIe cable from the graphics card by pressing down on the clip and pulling it away. 2. Use a Phillips screwdriver to remove the screws securing the GPU to the PCIe slots on the back of the PC.
3. Press down on the PCIe latch to fully release the GPU. 4. You can also refer to various online tutorials and forums for more specific instructions.
Conclusion
To remove a GPU from a motherboard, follow these steps: disconnect the PCIe cable by pressing down the clip and releasing the connector, remove the screws holding down the GPU to the PCIe slots, press down on the PCIe latch to fully release the GPU.
Make sure to remove any display cables before starting the process. Remember to turn off your computer and disconnect the power supply before removing the GPU. Swapping out a GPU from a motherboard is possible without replacing the entire motherboard, as long as the CPU and GPU are compatible.


Leave a Reply