To turn off XMP, access your computer’s BIOS settings and disable the XMP profile.
What Is Xmp And Its Impact On Ram Performance?
XMP, or Extreme Memory Profile, is a feature that allows RAM to run at higher frequencies for improved performance. However, if you encounter issues or instability, you may need to turn off XMP in your BIOS settings. Disabling XMP can be done by resetting the BIOS to its default settings or manually adjusting the frequency and timings of the RAM.
Explanation Of Xmp And Its Role In Ram Performance
Before diving into how to turn off XMP, it’s important to understand what XMP is and how it impacts RAM performance. XMP, which stands for eXtreme Memory Profile, is a feature in the BIOS (Basic Input/Output System) of your computer’s motherboard. It allows for automatic overclocking of RAM (Random Access Memory) modules, enabling them to run at higher frequencies and faster speeds than their default settings.
When you enable XMP, it applies preconfigured settings specified by the RAM manufacturer, which optimize the memory modules’ performance. This includes adjusting the frequency, voltage, and timings of the RAM. By doing so, XMP unlocks the full potential of your RAM, allowing it to deliver improved performance and speed.
Understanding The Benefits And Drawbacks Of Xmp
Now that we’ve discussed what XMP is and its role in RAM performance, let’s explore its benefits and drawbacks:
| Benefits of XMP | Drawbacks of XMP |
|---|---|
|
|
Considering these benefits and drawbacks, it’s important to weigh the potential performance gains against the risks before deciding whether to enable or disable XMP for your RAM. If you’re experiencing stability issues or prefer a more conservative approach to system settings, turning off XMP may be a preferable option.
In the next section, we’ll delve into the steps for disabling XMP to revert your RAM to its default settings, ensuring smoother and more stable system operation.
Why Would You Want To Disable Xmp?
While XMP (eXtreme Memory Profile) is a beneficial feature for boosting RAM performance, there are circumstances where you may want to disable it. Understanding the reasons for disabling XMP can help you make an informed decision based on your specific needs and requirements.
Discussing Reasons For Disabling Xmp
There are a few reasons why you might consider turning off XMP:
- Incompatibility with certain hardware: In some cases, enabling XMP can lead to compatibility issues with certain motherboards or CPU configurations. Disabling XMP ensures stability and prevents any potential conflicts.
- Troubleshooting performance issues: If you are experiencing crashes, freezes, or other performance issues after enabling XMP, disabling it can help you troubleshoot and identify the root cause of the problem.
- Power consumption concerns: XMP can overclock your RAM, resulting in higher power consumption. If you are prioritizing energy efficiency or have a system with limited power capacity, disabling XMP can help optimize power usage.
- Compatibility with older software: Some older software or games may not be fully compatible with XMP. Disabling XMP ensures compatibility with a wider range of applications and avoids any potential stability issues.
Potential Issues And Risks Associated With Xmp
While XMP can provide performance benefits, there are potential issues and risks that should be considered:
- System instability: Overclocking your RAM through XMP can sometimes lead to system instability, resulting in crashes or freezes. Disabling XMP can help resolve such issues.
- Heat generation: Overclocking through XMP can generate more heat, potentially putting additional strain on your system’s cooling capabilities. Disabling XMP reduces the risk of overheating and prolongs the lifespan of your components.
- Voiding warranty: Overclocking your RAM through XMP may void your warranty, as it involves pushing the memory beyond its specified limits. Disabling XMP ensures that your RAM operates within the manufacturer’s recommended parameters.
- Data corruption: In rare cases, aggressive overclocking through XMP can cause data corruption, potentially leading to data loss. Disabling XMP mitigates the risk of such data corruption.
Step-by-step Guide To Disabling Xmp In Bios
Looking for a step-by-step guide on disabling XMP in BIOS? Check out various resources like Reddit, Steam Community, Quora, and YouTube for instructions on how to turn off XMP and optimize your system’s memory performance. Remember, disabling XMP can be a safer option to avoid potential issues and ensure stable RAM settings.
If you are experiencing issues with your RAM or simply want to revert to default settings, disabling XMP in your BIOS can be a simple yet effective solution. In this step-by-step guide, we will walk you through the process of turning off XMP in your BIOS settings.
Accessing Bios Settings
The first step is to access your BIOS settings. Follow these steps:
- Restart your computer.
- During the startup process, look for a prompt that tells you which key to press to enter BIOS. This key is usually Del, F2, or F10, but it may vary depending on your motherboard manufacturer.
- Press the designated key to enter BIOS.
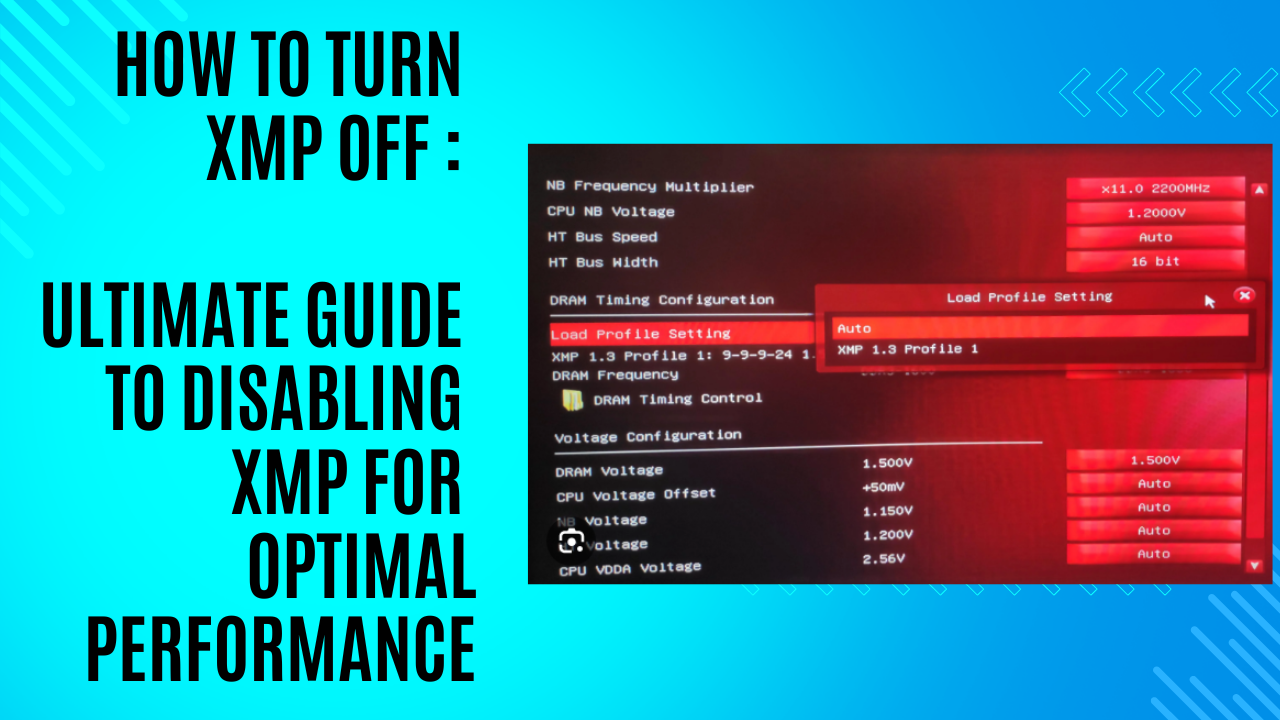
Locating The Xmp Option
Once you are in the BIOS settings, you need to locate the XMP option. Here’s how:
- Using your keyboard, navigate through the options in the BIOS menu. Look for a section related to memory or overclocking.
- Within this section, you should find the XMP (Extreme Memory Profile) option.
Disabling Xmp And Saving Changes
Now that you have found the XMP option, follow these steps to disable it:
- Select the XMP option and change its value to “Disabled” or “Off”.
- Save your changes and exit the BIOS settings. Look for an option to save and exit, typically located at the bottom of the screen.
- Your computer will now restart with XMP disabled.
It’s important to note that disabling XMP may revert your RAM settings to default, potentially resulting in slower performance. However, if you are experiencing stability issues or want to troubleshoot other problems, turning off XMP can help.
We hope this step-by-step guide has been helpful in disabling XMP in your BIOS settings. Remember to always save your changes before exiting the BIOS, and feel free to reach out if you have any further questions or concerns.
Alternative Methods To Optimize Ram Performance Without Xmp
Looking for alternative methods to optimize RAM performance without using XMP? There are various options available such as manually adjusting the frequency and timings in the BIOS settings, disabling XMP profiles, or resetting the BIOS to its default settings. Check out online resources like forums, Reddit, or YouTube tutorials for step-by-step instructions on how to turn XMP off and optimize your RAM performance.
If you’re looking to optimize your RAM performance but prefer not to use XMP, there are alternative methods you can explore. These methods may require manual adjustments in the BIOS settings and tweaking memory timings and frequencies to ensure optimal performance. In this section, we will discuss two alternative approaches you can take to optimize your RAM performance without relying on XMP.
Exploring Other Bios Settings For Ram Optimization
When it comes to optimizing RAM performance, the BIOS settings play a crucial role. By exploring and adjusting these settings, you can fine-tune your RAM for better performance. Here are some BIOS settings to consider:
- Voltage settings: Adjusting the RAM voltage can potentially improve stability and performance. However, it is important to note that increasing the voltage beyond the recommended safe limits can lead to overheating and damage to your RAM.
- Memory frequency: Adjusting the memory frequency allows you to overclock your RAM, potentially unlocking higher performance. However, it is essential to find the right balance as setting the frequency too high can cause instability.
- Memory sub-timings: In addition to memory frequency, manually tweaking memory sub-timings such as CAS latency, tRCD, and tRP can also have a significant impact on RAM performance. Experimenting with these timings while keeping the voltage within safe limits can help optimize performance.
- Power management: Some BIOS settings related to power management, such as C-states and SMT, can affect RAM performance. Disabling certain power-saving features may result in improved performance, although it may also lead to increased power consumption.
Manually Adjusting Memory Timings And Frequencies
If you prefer a more hands-on approach to optimizing your RAM performance, manually adjusting memory timings and frequencies can be a viable option. This method allows you to have complete control over the specific parameters that affect your RAM performance.
By referring to your RAM’s specifications and the manufacturer’s guidelines, you can manually adjust the timings and frequencies in the BIOS to achieve the desired performance. However, keep in mind that manually tweaking these settings requires careful consideration and understanding of your RAM’s capabilities and limitations.
It is advisable to start with conservative adjustments and monitor system stability and performance. Gradually increase the frequency and tweak the timings, testing the system after each adjustment to ensure stability. Remember to keep an eye on temperatures and voltages to avoid any potential risks.
While manually adjusting memory timings and frequencies can be time-consuming and require some trial and error, it provides a level of customization that may result in better RAM performance compared to relying solely on XMP profiles.
The Impact Of Disabling Xmp On System Stability And Performance
Disabling XMP can have an impact on the stability and performance of your system. It’s safer to run your RAM at standard settings rather than enabling XMP, as it may cause issues. If you’re experiencing game crashes or closings, you can try disabling the XMP profile in your BIOS.
Analyzing The Effect On System Stability
Disabling XMP, or Extreme Memory Profile, can have a significant impact on the stability of your system. XMP is a feature present in most motherboards that allows for automatic overclocking of RAM, optimizing it for better performance. However, enabling XMP may sometimes result in stability issues, such as system crashes, freezes, or even the inability to boot properly.
When XMP is enabled, it pushes the RAM to run at higher frequencies and tighter timings than the default settings. This can put a strain on the memory controller and the overall system. Certain processors, particularly those on AMD platforms, may struggle to handle these aggressive settings. Disabling XMP can provide relief to the system, allowing it to run at a more stable configuration.
Assessing Performance Differences Between Enabled And Disabled Xmp
While disabling XMP may increase system stability, it’s important to understand the impact it can have on performance. XMP is designed to unleash the full potential of your RAM, allowing it to operate at higher frequencies and lower latencies than the stock settings. This can result in improved overall system performance, especially in tasks that heavily rely on memory, such as video editing or gaming.
When XMP is disabled, the RAM reverts to its default settings, which are often more conservative. This means that the memory operates at lower frequencies and looser timings, potentially sacrificing some performance gains. However, the actual performance difference between enabled and disabled XMP will depend on various factors, including the specific RAM modules, the motherboard’s capability to handle higher frequencies, and the workload you put on your system.
To assess the performance differences between enabled and disabled XMP, it is recommended to run benchmarks and test various applications or games that you frequently use. This will allow you to compare the results and determine if the trade-off between stability and performance suits your needs.
Important: Keep in mind that the actual impact on system stability and performance when disabling XMP can vary from system to system. It is always recommended to consult your motherboard’s manual and consider the specific recommendations for your hardware before making any changes.
Troubleshooting Common Issues When Disabling Xmp
Disabling XMP (Extreme Memory Profile) on your computer can sometimes lead to certain issues that may affect the overall performance and stability of your system. It’s important to be aware of these potential problems and know how to troubleshoot them effectively. In this section, we will address some common issues that may arise when disabling XMP and provide you with troubleshooting tips and solutions to overcome them.
Addressing Potential Issues That May Arise From Disabling Xmp
When you disable XMP, there are a few potential issues that you might encounter. Here, we will discuss these issues in detail:
Troubleshooting Tips And Solutions
In order to troubleshoot the issues that may arise from disabling XMP, here are a few tips and solutions:
- Memory instability: Disabling XMP can sometimes result in memory instability, leading to frequent crashes or system freezes. To address this issue, manually configure the memory timings and voltages in the BIOS to match the specifications recommended by the memory manufacturer. This will provide stable performance without relying on XMP.
- Performance degradation: If you notice a significant decrease in performance after disabling XMP, it could be due to running the memory at default settings. To optimize performance, try manually overclocking the memory by adjusting the frequency and timings in the BIOS. This will help you achieve higher performance levels without relying on XMP.
- Incompatibility with other components: Disabling XMP can sometimes lead to compatibility issues with other system components. If you experience issues such as compatibility errors or system instability, ensure that all your components are up-to-date with the latest drivers and firmware. Additionally, consider updating your motherboard BIOS to the latest version, as it may include fixes for compatibility issues.
- Limited RAM speed: Without XMP, your RAM may run at a lower speed than its rated specifications. To maximize your RAM’s speed, manually set the frequency and timings in the BIOS to match the advertised specifications. This will allow you to achieve the full potential of your memory module without relying on XMP.
- Loss of pre-configured profiles: Disabling XMP means that you won’t be able to utilize the pre-configured profiles provided by the memory manufacturer. However, you can still manually configure the memory settings in the BIOS to match these profiles, ensuring optimal performance and stability.
By following these troubleshooting tips and solutions, you can effectively address the common issues that may arise when disabling XMP. Remember to carefully configure the memory settings in your BIOS to ensure stability and performance, even without XMP enabled.

Credit: www.amazon.com
Frequently Asked Questions On How To Turn Xmp Off
How Do I Turn Off Xmp?
To turn off XMP, you can follow these steps: 1. Access your computer’s BIOS settings. 2. Look for the XMP (eXtreme Memory Profile) option. 3. Disable or turn off the XMP setting. 4. Save your changes and exit the BIOS. 5.
Your system will now run with default RAM settings. It’s important to note that disabling XMP may affect the performance of your RAM, so proceed with caution.
How Do I Stop Xmp?
To stop XMP, follow these steps: 1. Access your BIOS settings. 2. Look for the XMP option. 3. Disable or turn off XMP. 4. Save and exit the BIOS. 5. Restart your computer. Remember, disabling XMP may affect your RAM performance, so proceed with caution.
Is It Good To Disable Xmp?
It is not recommended to disable XMP, as it can improve the performance of your RAM by running it at its optimal settings. Disabling XMP may cause your RAM to run at lower speeds, resulting in slower performance. However, if you are experiencing stability issues or crashes, you may consider disabling XMP and manually adjusting the RAM settings.
How To Turn On Xmp In Bios?
To turn on XMP in BIOS, follow these steps: 1. Restart your computer and enter BIOS by pressing [key]. 2. Navigate to the “Memory” or “Advanced Settings” section. 3. Look for the XMP or Extreme Memory Profile setting. 4. Select the XMP profile and enable it.
5. Save and exit BIOS. Note: XMP allows your RAM to run at higher speeds, but make sure your system is stable before enabling it.
Conclusion
To conclude, disabling XMP can be a safer option for running your RAM at standard settings and minimizing any potential issues. While enabling XMP may allow for higher performance, it is important to consider the stability and reliability of your system.
If you’re experiencing game crashes or system instability, disabling XMP in the BIOS could be a solution worth trying. Remember to consult your motherboard’s manual or seek guidance from online resources when navigating these settings. Ultimately, finding the right balance between performance and stability is key.


Leave a Reply